Astro-可添加内容
Markdown 通常用于创作文本繁重的内容,如博客文章和文档。Astro 包括对 Markdown 文件的内…
Markdown
Markdown 通常用于创作文本繁重的内容,如博客文章和文档。Astro 包括对 Markdown 文件的内置支持,这些文件还可以包括 frontmatter YAML(或 TOML)来定义自定义属性,例如标题、描述和标签。
在 Astro 中,你可以在 GitHub 风格的 Markdown 中创作内容,然后在 .astro 组件中渲染它。它结合了为内容设计熟悉的书写格式、 Astro 组件语法以及架构的灵活性。
有关其他功能,例如在 Markdown 中包含组件和 JSX 表达式,请添加
@astrojs/mdx集成以使用 MDX 编写 Markdown 内容。
组织 Markdown 文件
你的本地 Markdown 文件可以保存在 src/ 目录中的任何位置。在 src/pages/ 目录下的 Markdown 文件将会自动生成 Markdown 页面于你的网页上。
你的 Markdown 内容和 frontmatter 属性都可以通过 本地文件导入 来在组件中加以使用,或者当 使用内容集合助手函数来查询和渲染数据请求 时也能使用。
imports导入与内容集合查询
要将单个本地的 Markdown 文件的导入到 .astro 组件,可以使用 import 语句来实现,而要想一次性查询多个文件,则可以使用 Vite 的 import.meta.glob()。从这些 Markdown 文件中导出的数据 可以在 .astro 组件中使用。
备注
import.meta.glob() 是 Vite(Astro 底层构建工具) 提供的一个模块导入语法糖,
用于批量导入多个文件,常用于读取内容、生成路由或加载资源。
一、基础语法
const modules = import.meta.glob('./pages/*.js');这行代码会告诉 Vite:
把当前目录下所有符合
./pages/*.js的文件都“注册”进来。
返回结果是一个对象, 键(key)是文件路径, 值(value)是一个 异步导入函数。
例如:
{
  './pages/a.js': () => import('./pages/a.js'),
  './pages/b.js': () => import('./pages/b.js')
}
所以你可以这样动态加载文件:
const modules = import.meta.glob('./pages/*.js');

for (const path in modules) {
  const mod = await modules[path](); // 异步导入模块
  console.log(path, mod);
}
当你添加 { eager: true } 参数时:
const modules = import.meta.glob('./pages/*.js', { eager: true });表示 立即导入所有模块(同步导入), 而不是返回异步函数。
也就是说,返回的对象会变成这样:
{
  './pages/a.js': { ...a.js 导出的内容 },
  './pages/b.js': { ...b.js 导出的内容 }
}
此时不需要再 await 或 () 调用。
这些文件会在运行时立即被加载并打包进最终文件中。
import.meta.glob() 导出的不是源文件文本,而是模块化后的导出对象。
如果你有一组相关的 Markdown 文件,可以考虑将它们定义为collections。这将为你提供一些好处,其中包括了能够将 Markdown 文件存储在文件系统上的任何位置或使用远程存储。
集合使用专注于内容的优化 API 来 查询和渲染你的 Markdown 内容,这种方式代替了文件导入。集合适用于共享相同结构的数据集,例如博客文章或产品项。当你在 schema 中定义集合时,还可以在编辑器中获得验证、类型安全和智能提示。
类 JSX 的动态表达式
导入或查询 Markdown 文件后,你可以在 .astro 组件中编写包含 frontmatter 数据和正文内容的动态 HTML 模板。
src/pages/posts/great-post.md
---
title: '有史以来最好的文章'author: 'Ben'
---
这是我的 _很棒_ 的文章!
src/pages/my-posts.astro
---
import * as greatPost from './posts/great-post.md';
const posts = Object.values(import.meta.glob('./posts/*.md', { eager: true }));
---

<p>{greatPost.frontmatter.title}</p>
<p>Written by: {greatPost.frontmatter.author}</p>

<p>Post Archive:</p>
<ul>
  {posts.map(post => <li><a href={post.url}>{post.frontmatter.title}</a></li>)}
</ul>
可用属性
来自 content collections queries 的 Markdown
当你使用辅助函数 getCollection() 或 getEntry() 从集合中获取数据时,Markdown 的 frontmatter 属性会通过一个 data 对象提供(例如:post.data.title)。此外,body 属性包含未经编译的正文内容字符串。
render() 函数会返回你的 Markdown 正文内容、自动生成的标题列表,以及在应用了任何 remark 或 rehype 插件后被修改的 frontmatter 对象。
详细了解 使用集合查询返回的内容。
使用import导入的 Markdown
当使用 import 或 import.meta.glob() 导入 Markdown 时,以下导出的属性在你的 .astro 组件中可用:
| 属性/函数 | 说明 |
|---|---|
file | 文件的绝对路径(例如:/home/user/projects/.../file.md)。 |
url | 页面对应的 URL(例如:/en/guides/markdown-content)。 |
frontmatter | 包含文件中 YAML(或 TOML)frontmatter 中定义的所有数据。 |
<Content /> | 一个组件,返回该文件完整的已渲染内容。 |
rawContent() | 一个函数,返回原始的 Markdown 文档字符串。 |
compiledContent() | 一个异步函数,返回编译为 HTML 字符串的 Markdown 文档。 |
getHeadings() | 一个异步函数,返回文件中所有标题(<h1> 到 <h6>)的数组,类型为 { depth: number; slug: string; text: string }[]。每个标题的 slug 对应生成的 ID,可用于锚点链接。 |
“slug” 是一种简短、URL 友好的字符串,通常由标题或名称转换而来,用于在 URL 中唯一标识某个内容。
比如:
标题 生成的 slug 用途 Hello World!hello-world用于 /blog/hello-world这样的链接关于我们关于我们或guan-yu-wo-men(取决于配置)用于 /about/关于我们Astro 入门指南astro-入门指南用于锚点链接 #astro-入门指南在 Markdown 或网站生成中,slug 通常对应页面或标题的唯一 ID,常用于:
- 生成页面路径(例如
/posts/my-first-post)- 生成锚点链接(例如
#section-title)- 在系统内部引用特定内容
简单来说,slug 是把一个标题或名字“转换成 URL 可用形式”的版本。
示例 Markdown 博客文章可能会传递以下 Astro.props 对象:
Astro.props = {

  file: "/home/user/projects/.../file.md",

  url: "/en/guides/markdown-content/",

  frontmatter: {

    /** 从博客文章中获取的 Frontmatter */

    title: "Astro 0.18 Release",

    date: "Tuesday, July 27 2021",

    author: "Matthew Phillips",

    description: "Astro 0.18 is our biggest release since Astro launch.",

  },

  getHeadings: () => [

    {"depth": 1, "text": "Astro 0.18 Release", "slug": "astro-018-release"},

    {"depth": 2, "text": "Responsive partial hydration", "slug": "responsive-partial-hydration"}

    /* ... */

  ],

  rawContent: () => "# Astro 0.18 Release\nA little over a month ago, the first public beta [...]",

  compiledContent: () => "<h1>Astro 0.18 Release</h1>\n<p>A little over a month ago, the first public beta [...]</p>",

}
<Content /> 组件
<Content /> 组件可通过从 Markdown 文件导入 Content 来使用。此组件返回文件的完整正文内容,并渲染为 HTML。你也可以根据需要将 Content 重命名为任意你喜欢的组件名称。
同样地,你可以通过渲染 <Content /> 组件来显示 Markdown 集合条目的 HTML 内容。
src/pages/content.astro
---
// Import statement
import {Content as PromoBanner} from '../components/promoBanner.md';

// 集合查询
import { getEntry, render } from 'astro:content';

const product = await getEntry('products', 'shirt');
const { Content } = await render(product);
---
<h2>Today's promo</h2>
<PromoBanner />

<p>Sale Ends: {product.data.saleEndDate.toDateString()}</p>
<Content />
标题 ID
在 Markdown 中编写标题会自动为你提供锚点链接,以便你可以直接跳转到页面的某些部分。
src/pages/page-1.md
---
title: 我的文章目录
---
## 简介

当我使用 Markdown 时,我可以在同一个页面内链接到 [我的结论](#结论) 部分。

## 结论

我可以通过在浏览器访问 `https://example.com/page-1/#简介` 以直接导航到简介部分。
Astro 基于 github-slugger 生成标题 id。你可以在 github-slugger 文档 中找到更多示例。
标题 ID 与插件
Astro 会为 Markdown 和 MDX 文件中的所有标题元素(<h1> 到 <h6>)自动注入一个 id 属性。
你可以通过以下两种方式获取这些数据:
-
使用从导入的 Markdown 文件中导出的属性
getHeadings()工具; -
或者在从内容集合查询中获取的 Markdown 使用
render()函数时,从返回结果中获取。
你可以通过添加注入 id 属性的 rehype 插件(例如 rehype-slug)来自定义这些标题 ID。你的自定义 ID 将替代 Astro 的默认 ID,反映在 HTML 输出和 getHeadings() 返回的数组中。
默认情况下,Astro 会在所有 rehype 插件执行完之后再为标题注入 id 属性。
如果你的自定义 rehype 插件需要访问由 Astro 注入的这些 id,你可以直接导入并使用 Astro 提供的 rehypeHeadingIds 插件。
请确保在任何依赖这些 ID 的插件之前添加 rehypeHeadingIds。
astro.config.mjs
import { defineConfig } from 'astro/config';
--import { rehypeHeadingIds } from '@astrojs/markdown-remark';
++import { otherPluginThatReliesOnHeadingIDs } from 'some/plugin/source';

export default defineConfig({
  markdown: {
    rehypePlugins: [
++    rehypeHeadingIds,
      otherPluginThatReliesOnHeadingIDs,
    ],
  },
});
Markdown 插件
Astro 中的 Markdown 支持由 remark 提供,remark 是一个强大的解析和处理工具,拥有一个活跃的生态系统。
Astro 默认启用了 GitHub 风格的 Markdown(GitHub-flavored Markdown)和 SmartyPants 插件。 这带来了一些便利功能,例如:
-
自动将文本中的链接转换为可点击的超链接;
-
为引号和破折号(em-dash)提供更美观的排版格式。
你可以在 astro.config.mjs 中自定义 remark 解析 Markdown 的方式。请参阅完整的 Markdown 配置选项列表。
添加 remark 和 rehype 插件
备注
在 Astro(以及整个 Markdown 生态)中,remark 和 rehype 是两种功能相似但处理阶段不同的插件系统。可以简单理解为:
| 对比项 | remark | rehype |
|---|---|---|
| 处理对象 | Markdown 文本(.md / .mdx) | HTML 内容 |
| 处理阶段 | 在 Markdown → HTML 转换 之前 | 在 HTML 已生成 之后 |
| 数据结构 | MDAST(Markdown 抽象语法树) | HAST(HTML 抽象语法树) |
| 常见用途 | 修改 Markdown 内容,如处理 frontmatter、替换文本、语法扩展等 | 修改 HTML 输出,如添加属性、包裹标签、语法高亮、处理标题 ID 等 |
| 典型插件示例 | remark-gfm(支持 GitHub 风格 Markdown)、remark-smartypants | rehype-autolink-headings、rehype-slug |
| 在 Astro 中的作用 | 处理 Markdown 原文 | 处理渲染后的 HTML |
Astro 支持添加第三方 remark 和 rehype 插件来解析 Markdown。这些插件允许你扩展你的 Markdown,以获得新的功能,例如 自动生成目录,应用可访问的表情符号标签,以及为你的 Markdown 添加样式。
我们鼓励你浏览 awesome-remark 和 awesome-rehype 来查看流行的插件!
这个例子将 remark-toc 和 rehype-accessible-emojis 应用于 Markdown 文件(一个是目录,一个是表情符号标签):
astro.config.mjs
import { defineConfig } from 'astro/config';
import remarkToc from 'remark-toc';
import { rehypeAccessibleEmojis } from 'rehype-accessible-emojis';

export default defineConfig({
  markdown: {
    remarkPlugins: [ [remarkToc, { heading: 'toc', maxDepth: 3 } ] ],
    rehypePlugins: [rehypeAccessibleEmojis],
  },
});
自定义插件
要自定义插件,可以在插件后面通过嵌套数组的形式传入一个 配置对象(options object)。
下面的示例展示了如何:
- 为
remarkToc插件添加heading选项,用来控制目录(Table of Contents, TOC)的插入位置; - 为
rehype-autolink-headings插件添加behavior选项,使锚点标签添加在标题文字之后。
astro.config.mjs
import remarkToc from 'remark-toc';
import rehypeSlug from 'rehype-slug';
import rehypeAutolinkHeadings from 'rehype-autolink-headings';

export default {
  markdown: {
    remarkPlugins: [ [remarkToc, { heading: "contents"} ] ],
    rehypePlugins: [rehypeSlug, [rehypeAutolinkHeadings, { behavior: 'append' }]],
  },
}
注意
一、Astro 确实会自动为标题添加 id
是的,Astro 内部会为 Markdown 和 MDX 文件中的所有标题(<h1>~<h6>)自动注入 id 属性。
👉 但这个动作的时机是「在所有 rehype 插件执行完之后」。也就是说:
当 rehype 插件(包括
rehype-autolink-headings)运行时,这些标题的id还不存在。
二、rehype-autolink-headings 的工作原理
rehype-autolink-headings 需要标题节点上已经有 id 才能知道往哪里插入 <a> 锚点链接。
如果没有 id,它就无法生成可点击的链接。而 rehypeSlug 的作用就是在 rehype 阶段:
先扫描所有标题并为它们生成
id(slug)。
这样,接下来的 rehype-autolink-headings 才能找到这些 id 并正确地添加锚点。
语法问题:
这两种写法其实都是「合法的插件声明」
写法 含义 rehypeSlug插件本身,不带任何配置(即使用默认设置) [rehypeAutolinkHeadings, { behavior: 'append' }]插件 + 配置对象(传递参数) 换句话说:
- 不带数组 → 插件使用默认行为;
- 带嵌套数组 → 传入第二个元素作为配置项。
插件示例
安装:
npm install remark-slug rehype-autolink-headings配置astro.config.mjs
// @ts-check
import { defineConfig } from 'astro/config';

import remarkSlug from 'remark-slug';
import rehypeAutolinkHeadings from 'rehype-autolink-headings';
import remarkToc from 'remark-toc';
export default defineConfig({
  markdown: {
    remarkPlugins: [
      //生成ID
      remarkSlug,
      //生成目录
      [remarkToc, { heading: '目录', maxDepth: 2 }],
    ],
    //每个标题后面加上符号处理
    rehypePlugins: [[rehypeAutolinkHeadings, { behavior: 'append' }]],
      //或者设置第二个参数 {behavior: 'append',content: { type: 'text', value: '#' },这样就会生成文本#在每个标题后面
    },
  },
});
效果:
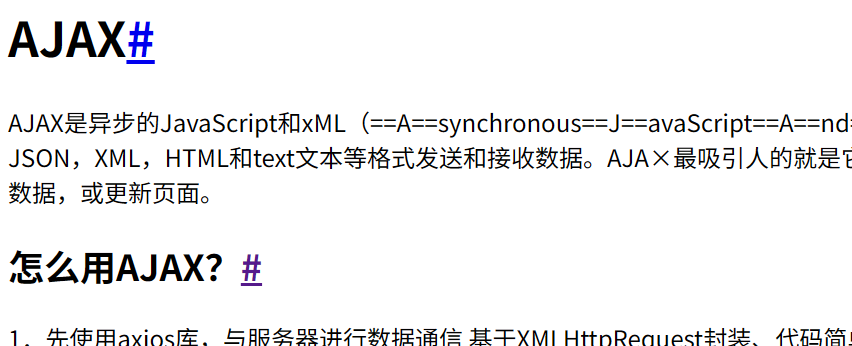
现在每个标题后面都有#,但是太丑了,现在添加样式优化:
1、设置CSS
<style is:global>
/* 默认隐藏伪元素(图标),并准备好过渡效果 */
.icon-link::before {
  content: "🔗";               /* 想要的符号(也可以换成 "#" 或空心链条等) */
  opacity: 0;
  transition: opacity 0.5s ease;
  pointer-events: none;       /* 关键:避免伪元素本身捕获 hover,导致抖动或自我触发 */
}

/* 当悬停整个标题(h1-h6)时显示图标 */
/* 也包含 focus(键盘可访问时)和 :focus-within 的情况 */
:where(h1,h2,h3,h4,h5,h6):hover > a[aria-hidden="true"] .icon-link::before {
  opacity: 1;
  transform: translateY(0);
}

/* 额外:保持锚点颜色/布局稳定(按你站点风格调整) */
a[aria-hidden="true"] {
  text-decoration: none;
  color: inherit;
}
<style/>
编程式修改 frontmatter
你可以通过使用 remark 或 rehype 插件 为所有 Markdown 和 MDX 文件添加 frontmatter 属性。
- 从插件的
file参数中将customProperty附加到data.astro.frontmatter属性:
example-remark-plugin.mjs
export function exampleRemarkPlugin() {

  // 所有 remark 和 rehype 插件都返回一个单独的函数

  return function (tree, file) {
    file.data.astro.frontmatter.customProperty = 'Generated property';
  }

}
添加于:
astro@2.0.0
data.astro.frontmatter包含给定 Markdown 或 MDX 文档的所有属性。这允许你修改现有的 frontmatter 属性,或者从现有的 frontmatter 计算新属性。
- 将此插件应用于你的
markdown或mdx集成配置:
astro.config.mjs
import { defineConfig } from 'astro/config';
++import { exampleRemarkPlugin } from './example-remark-plugin.mjs';

export default defineConfig({
  markdown: {
    remarkPlugins: [exampleRemarkPlugin]
  },
});
或者
astro.config.mjs(MDX文件)
import { defineConfig } from 'astro/config';
++import { exampleRemarkPlugin } from './example-remark-plugin.mjs';

export default defineConfig({
  integrations: [
    mdx({
++    remarkPlugins: [exampleRemarkPlugin],
    }),
  ],
});
现在,每个 Markdown 或 MDX 文件都会在其 frontmatter 中包含 customProperty,
这样当你导入这些 Markdown 文件,或在布局文件中通过 Astro.props.frontmatter 访问时,该属性都会可用。
从 MDX 扩展 Markdown 配置
Astro 的 MDX 集成默认情况下会扩展你的项目的现有 Markdown 配置。要覆盖单个选项,你可以在 MDX 配置中指定它们的等效项。
下面的示例禁用了 GitHub-Flavored Markdown,并为 MDX 文件应用了不同的 remark 插件集:
astro.config.mjs
import { defineConfig } from 'astro/config';
import mdx from '@astrojs/mdx';

export default defineConfig({
  markdown: {
    syntaxHighlight: 'prism',
    remarkPlugins: [remarkPlugin1],
    gfm: true,
  },
  integrations: [
    mdx({
      // `syntaxHighlight` inherited from Markdown

      // Markdown `remarkPlugins` ignored,
      // only `remarkPlugin2` applied.
      remarkPlugins: [remarkPlugin2],
      // `gfm` overridden to `false`
      gfm: false,
    })
  ]
});
要避免从 MDX 扩展你的 Markdown 配置,请将 extendMarkdownConfig 选项(默认开启) 设置为 false:
astro.config.mjs
import { defineConfig } from 'astro/config';
import mdx from '@astrojs/mdx';

export default defineConfig({
  markdown: {
    remarkPlugins: [remarkPlugin],
  },
  integrations: [
    mdx({
      // Markdown config now ignored
      extendMarkdownConfig: false,
      // No `remarkPlugins` applied
    })
  ]
});
单独的 Markdown 页面
备注
内容集合(Content collections)以及将 Markdown 导入到 .astro 组件中,能为 Markdown 渲染提供更多功能,是推荐的内容管理方式。
然而,在某些情况下,你可能只想图个方便 —— 直接将文件添加到 src/pages/ 中,就能自动生成一个简单的页面。
Astro 将 /src/pages/目录内的任何受支持的文件视为页面,包括 .md 和其他 Markdown 文件类型。
将文件放在此目录或其任意子目录中,会根据文件的路径名自动生成页面路由,并将 Markdown 内容渲染为 HTML 进行显示。
Astro 还会自动在页面中添加 <meta charset="utf-8"> 标签,以便更方便地编写非 ASCII 字符内容。
src/pages/page-1.md
---
title: Hello, World
---

# Hi there!

This Markdown file creates a page at `your-domain.com/page-1/`

It probably isn't styled much, but Markdown does support:
- **bold** and _italics._
- lists
- [links](https://astro.build)
- <p>HTML elements</p>
- and more!
Frontmatter layout 属性
为了解决单个 Markdown 页面功能有限的问题,Astro 提供了一个特殊的 frontmatter 属性 —— layout。
该属性的值是一个指向 Astro Markdown 布局组件的相对路径。
需要注意的是:
当你使用 内容集合(content collections) 来查询和渲染 Markdown 内容时,layout 并不是一个特殊属性;
此外,在其他用途下也不保证该属性会被支持。
如果你的 Markdown 文件位于 src/pages/ 目录中,可以创建一个布局组件,并在该文件的 layout 属性中指定它,以为你的 Markdown 内容提供一个页面外壳(page shell)。
src/pages/posts/post-1.md
---

++layout: ../../layouts/BlogPostLayout.astro

title: Astro 简介

author: Himanshu

description: 发现 Astro 的魅力之所在!

---

这是一篇使用 Markdown 编写的文章。
这个布局组件是一个普通的 Astro 组件,但在模板中可以通过 Astro.props 自动获取一些特定的属性。
例如,你可以通过 Astro.props.frontmatter 访问 Markdown 文件中的 frontmatter 属性。
src/layouts/BlogPostLayout.astro
---
const {frontmatter} = Astro.props;
---
<html>
  <head>
    <!-- ... -->
    <meta charset="utf-8"> // no longer added by default
  </head>
  <!-- ... -->
  <h1>{frontmatter.title}</h1>
  <h2>Post author: {frontmatter.author}</h2>
  <p>{frontmatter.description}</p>
  <slot /> <!-- Markdown content is injected here -->
  <!-- ... -->
</html>
当使用 frontmatter 的 layout 属性时,你必须在布局组件中手动添加 <meta charset="utf-8"> 标签,因为 Astro 将不再自动为页面插入它。
此外,你现在还可以在布局组件中为 Markdown 内容添加自定义样式。
请求远程 Markdown
Astro 内置的 Markdown 处理器无法用于处理远程 Markdown 内容。
如需在内容集合中使用远程 Markdown,您需构建一个能调用 renderMarkdown() 函数的自定义加载器。
若需直接获取远程 Markdown 并渲染为 HTML,您必须从 NPM 自行安装并配置 Markdown 解析器。此方式将不会继承您在 Astro 中配置的任何内置 Markdown 设置。
在项目中实施前,请务必了解这些限制,并优先考虑通过内容集合加载器获取远程 Markdown。
src/pages/remote-example.astro
---

// 示例:从一个远程的 API 接口请求 Markdown

// 并在运行时将其渲染为 HTML

// 使用了 "marked" 库 (https://github.com/markedjs/marked)

import { marked } from 'marked';

const response = await fetch('https://raw.githubusercontent.com/wiki/adam-p/markdown-here/Markdown-Cheatsheet.md');

const markdown = await response.text();

const content = marked.parse(markdown);

---

<article set:html={content} />
内容集合
添加于: astro@2.0.0
内容集合(Content collections) 是在任何 Astro 项目中管理内容集的最佳方式。集合有助于组织和查询文档,为你的编辑器启用智能提示和类型检查,并为所有内容提供自动的 TypeScript 类型安全。
Astro 5.0 引入了内容层(Content Layer)API,用于定义和查询内容集。这个高性能、可扩展的 API 为本地集合提供了内置的内容加载器(content loaders)。对于远程内容,你可以使用第三方和社区构建的加载器,或者创建自己的自定义加载器,从任何来源拉取数据。
什么是内容集合?
你可以从结构相似的数据集中定义一个集合。这可以是一个博客文章的目录,一个产品项目的 JSON 文件,或者任何代表相同形状的多个项目的数据。
本地存储在项目中或文件系统上的集合可以包含 Markdown、MDX、Markdoc、YAML、TOML 或 JSON 文件的条目:
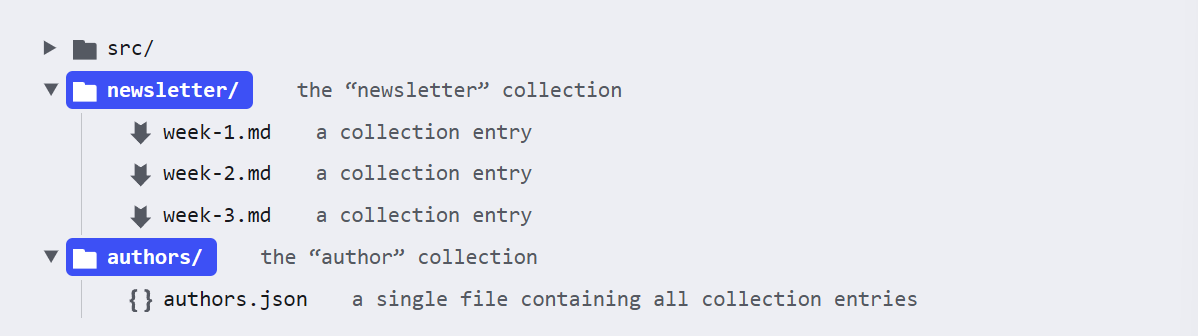
使用对应的集合加载器,你可以从任何外部来源获取远程数据,比如 CMS、数据库或无头支付系统。
集合的 TypeScript 配置
内容集合依赖 TypeScript 在编辑器中提供 Zod 验证、智能提示(IntelliSense)和类型检查。 如果你没有使用 Astro 的严格(strict)或最严格(strictest)TypeScript 设置,则需要确保在你的 tsconfig.json 中配置以下 compilerOptions:
如果你没有使用 Astro 官方推荐的 strict 或 strictest 模式(也就是较严格的类型检查模式),那你就要自己在 tsconfig.json 里手动设置一些配置项(compilerOptions),否则这些验证和智能提示可能不工作或不准确。
tsconfig.json
{

  // 包括在 "astro/tsconfigs/strict" 或 "astro/tsconfigs/strictest" 中

  "extends": "astro/tsconfigs/base",

  "compilerOptions": {

++  "strictNullChecks": true, // 使用 `base` 模板需要添加

    "allowJs": true // 必需,包含在所有 Astro 模板中

  }

}
定义集合
单个集合使用 defineCollection() 配置:
- 一个
loader用于数据源(必需) - 一个
schema用于类型安全(可选,但强烈推荐!)
集合配置文件
要定义集合,你必须在项目中创建一个 src/content.config.ts 文件(也支持 .js 和 .mjs 扩展名)。这是一个特殊的文件,Astro 将根据以下结构使用它来配置你的内容集合:
src/content.config.ts
// 1. Import utilities from `astro:content`
import { defineCollection, z } from 'astro:content';

// 2. Import loader(s)
import { glob, file } from 'astro/loaders';

// 3. Define your collection(s)
const blog = defineCollection({ /* ... */ });
const dogs = defineCollection({ /* ... */ });

// 4. Export a single `collections` object to register your collection(s)
export const collections = { blog, dogs };
Astro 内容集合自动加载规则
当你使用:
const authors = defineCollection({
  type: 'data'
});
或
const docs = defineCollection({
  type: 'content'
});
时,Astro 会自动从项目中的固定目录结构中加载文件,你不用自己写路径。
1️⃣ 内容集合(type: 'content')
const docs = defineCollection({ type: 'content', ... })🔹 Astro 自动从:
src/content/docs/加载所有 .md 或 .mdx 文件(递归扫描子目录)。
2️⃣ 数据集合(type: 'data')
const authors = defineCollection({ type: 'data', ... })🔹 Astro 自动从:
src/content/authors/加载所有非 Markdown 文件(例如 .json, .yaml, .yml, .toml)。
同样也会递归子目录。
定义集合 loader
内容层 API(Content Layer API) 允许您获取内容(无论存储在项目本地还是远程),并通过 loader 属性加载数据。
内置的加载器
Astro 提供了两种内置的加载器函数(glob() 和 file())用于获取本地内容,同时也支持通过 API 自定义加载器以获取远程数据。
glob() 加载器
从文件系统中的 Markdown、MDX、Markdoc、JSON、YAML 或 TOML 文件目录创建条目。它支持使用 micromatch 兼容的 glob 模式匹配目标文件,并需指定文件的基准路径。每个条目的 id 将自动基于文件名生成。适用场景:每个条目对应一个单独的文件。
file() 加载器
从单个本地文件创建多个条目,要求文件中的每个条目必须包含唯一的 id 键属性。需指定文件的基准路径,并可选择为无法自动解析的数据文件提供解析函数。适用场景:数据文件可解析为对象数组(如 JSON 数组)。
src/content.config.ts
import { defineCollection, z } from 'astro:content';
import { glob, file } from 'astro/loaders'; // 不适用于旧版 API

const blog = defineCollection({
  loader: glob({ pattern: "**/*.md", base: "./src/data/blog" }),
  schema: /* ... */
});
const dogs = defineCollection({
  loader: file("src/data/dogs.json"),
  schema: /* ... */
});

const probes = defineCollection({
// loader 可以接受字符串匹配模式或模式数组
// 加载 space-probes 目录下所有 markdown 文件,但排除以 "voyager-" 开头的文件
  loader: glob({ pattern: ['*.md', '!voyager-*'], base: 'src/data/space-probes' }),
  schema: z.object({
    name: z.string(),
    type: z.enum(['Space Probe', 'Mars Rover', 'Comet Lander']),
    launch_date: z.date(),
    status: z.enum(['Active', 'Inactive', 'Decommissioned']),
    destination: z.string(),
    operator: z.string(),
    notable_discoveries: z.array(z.string()),
  }),
});

export const collections = { blog, dogs, probes };
parser 函数
file() 加载器接受一个第二个参数,定义了一个 parser 函数。这允许你指定一个自定义解析器(例如 csv-parse)来从文件内容创建一个集合。
file() 加载器将自动检测和解析(基于它们的文件扩展名)JSON 和 YAML 文件中的单个对象数组,并将每个顶层表作为 TOML 文件中的独立条目处理。这些文件类型的支持是内置的,除非你有嵌套的 JSON 文件,否则不需要 parser。要使用其他文件,例如 .csv,你需要创建一个解析器函数。
下面的示例展示了如何导入一个 CSV 解析器,然后通过将文件路径和 parser 函数都传递给 file() 加载器,将名为 cats 的集合加载到你的项目中。
src/content.config.ts
import { defineCollection } from "astro:content";
import { file } from "astro/loaders";
import { parse as parseCsv } from "csv-parse/sync";

const cats = defineCollection({
  loader: file("src/data/cats.csv", { parser: (text) => parseCsv(text, { columns: true, skipEmptyLines: true })})
});
嵌套的 .json 文件
parser 参数还允许你从嵌套的 JSON 文档中加载单个集合。例如,这个 JSON 文件包含了多个集合:
src/data/pets.json
{"dogs": [{}], "cats": [{}]}你可以通过为每个集合传递一个自定义的 parser 来将这些集合分开:
src/content.config.ts
const dogs = defineCollection({
  loader: file("src/data/pets.json", { parser: (text) => JSON.parse(text).dogs })
});
const cats = defineCollection({
  loader: file("src/data/pets.json", { parser: (text) => JSON.parse(text).cats })
});
构建一个自定义加载器
你可以构建一个自定义加载器来从任何数据源(如 CMS、数据库或 API 端点)获取远程内容。
使用加载器请求数据将自动从远程数据创建一个集合。这为你提供了所有本地集合的好处,例如集合特定的 API 助手,如 getCollection() 和 render() 来查询和显示你的数据,以及模式验证。
https://docs.astro.build/en/guides/content-collections/#building-a-custom-loader
定义集合模式(Schema)
模式(Schema)通过 Zod 验证 来强制确保集合(collection)中的 frontmatter 或条目数据保持一致。
定义模式可以保证当你需要引用或查询这些数据时,它们始终以可预测的形式存在。
如果某个文件不符合其集合的模式要求,Astro 会提供一个清晰、有帮助的错误提示,告诉你具体问题。
模式还为 Astro 的内容提供了 自动 TypeScript 类型定义。 当你为集合定义了一个模式后,Astro 会自动为该集合生成并应用一个 TypeScript 接口。 这样,当你查询集合时,就能获得完整的 TypeScript 支持——包括属性自动补全和类型检查。
备注
为了让 Astro 识别新的或更新后的模式,你可能需要 重启开发服务器,或者通过快捷键 s + Enter 来同步内容层(content layer),以定义 astro:content 模块。
集合条目的每个 frontmatter 或数据属性都必须使用 Zod 数据类型 来定义。
src/content.config.ts
import { defineCollection, z } from 'astro:content';
import { glob, file } from 'astro/loaders'; // 不适用于旧版 API

const blog = defineCollection({
  loader: glob({ pattern: "**/*.md", base: "./src/data/blog" }),
  schema: z.object({
    title: z.string(),
    description: z.string(),
    pubDate: z.coerce.date(),
    updatedDate: z.coerce.date().optional(),
  })
});
const dogs = defineCollection({
  loader: file("src/data/dogs.json"),
  schema: z.object({
    id: z.string(),
    breed: z.string(),
    temperament: z.array(z.string()),
  }),
});

export const collections = { blog, dogs };
使用 Zod 定义数据类型
Astro 使用 Zod 来支持其内容模式。使用 Zod,Astro 能够验证集合中每个文件的数据,并在你查询内容时提供自动的 TypeScript 类型。
要在 Astro 中使用 Zod,请从 "astro:content" 导入 z 工具函数。这是 Zod 库的重新导出,支持 Zod 的所有功能。
// 示例:Zod 常用数据类型的速查表
import { z, defineCollection } from 'astro:content';

defineCollection({
  schema: z.object({
    isDraft: z.boolean(), // 是否为草稿
    title: z.string(), // 标题(字符串)
    sortOrder: z.number(), // 排序序号(数字)
    image: z.object({ // 图片对象
      src: z.string(), // 图片路径
      alt: z.string(), // 替代文本
    }),
    author: z.string().default('Anonymous'), // 作者(默认值'Anonymous')
    language: z.enum(['en', 'es']), // 语言枚举(英文/西班牙文)
    tags: z.array(z.string()), // 标签数组
    footnote: z.string().optional(), // 可选脚注

    // 在YAML中,未加引号的日期会被解析为Date对象
    publishDate: z.date(), // 示例: 2024-09-17

    // 将日期字符串转换为Date对象
    updatedDate: z.string().transform((str) => new Date(str)),

    authorContact: z.string().email(), // 作者联系邮箱(带格式验证)
    canonicalURL: z.string().url(), // 规范URL(带URL格式验证)
  })
})
有关 Zod 如何工作及其可用功能的完整文档,请参阅 Zod 的 README。
Zod 模式方法
所有 Zod 模式方法(例如 .parse()、.transform())都可用,但有一些限制。特别是,使用 image().refine() 对图像执行自定义验证检查是不支持的。
定义集合引用
集合条目(Collection entries)也可以“引用”(reference)其他相关的条目。
使用 Collections API 提供的 reference() 函数,你可以在一个集合的模式(schema)中,将某个属性定义为来自另一个集合的条目。
例如,你可以要求每一个 space-shuttle(航天飞机)条目都必须包含一个 pilot(飞行员)属性,而该属性会使用 pilot 集合 自己的模式来进行类型检查、自动补全和验证。
一个常见的例子是:
-
博客文章(blog post)引用可复用的作者信息(author profiles),这些信息以 JSON 文件 的形式存储;
-
或者文章引用同一集合中存放的 相关文章链接。
src/content.config.ts
import { defineCollection, reference, z } from 'astro:content';
import { glob } from 'astro/loaders';

const blog = defineCollection({
  loader: glob({ pattern: '**/[^_]*.md', base: "./src/data/blog" }),
  schema: z.object({
    title: z.string(),
    // 通过 `id` 从 `authors` 集合中引用单个作者
    author: reference('authors'),
    // 通过 `slug` 从 `blog` 集合中引用相关文章的数组
    relatedPosts: z.array(reference('blog')),
  })
});

const authors = defineCollection({
  loader: glob({ pattern: '**/[^_]*.json', base: "./src/data/authors" }),
  schema: z.object({
    name: z.string(),
    portfolio: z.string().url(),
  })
});

export const collections = { blog, authors };
这个博客文章示例指定了相关文章的 id 和作者的 id:
src/data/blog/welcome.md
---

title: "Welcome to my blog"

author: ben-holmes # references `src/data/authors/ben-holmes.json`

relatedPosts:

- about-me # references `src/data/blog/about-me.md`

- my-year-in-review # references `src/data/blog/my-year-in-review.md`

---
这些引用(references)会被转换成包含 collection 键和 id 键的对象,这样你就可以在模板中轻松地对它们进行查询。
自定义 ID(Defining custom IDs)
当你使用 glob() 加载器加载 Markdown、MDX、Markdoc 或 JSON 文件时,每个内容条目的 id 都会根据文件名自动生成,格式是对 URL 友好的(即适合用作网址的一部分)。
这个 id 可以用来直接从集合中查询对应条目,同时在基于内容创建新页面或 URL 时也非常有用。
你可以通过在文件的 frontmatter(文件头部信息)中,或者在 JSON 文件的数据对象中添加自定义的 slug 属性,
来覆盖自动生成的 id。
这类似于其他 Web 框架中的 “permalink(永久链接)” 功能。
src/blog/1.md
---

title: My Blog Post

slug: my-custom-id/supports/slashes

---

Your blog post content here.
slug: 自定义的 ID →"my-custom-id/supports/slashes"这意味着这篇文章的条目 ID 不再是由文件名
1.md自动生成的,而是被你手动设置成了my-custom-id/supports/slashes。 也就是说,当 Astro 加载内容时,这篇文章会以这个 slug 作为唯一标识符(可以带/)
src/categories/1.json
{

  "title": "My Category",

  "slug": "my-custom-id/supports/slashes",

  "description": "Your category description here."

}
这是一个 JSON 内容条目,存放在
categories集合里。同样定义了:
slug: 自定义的 ID(和上面的博客文章一样)这里的
slug也可以用作该分类的唯一 ID。
注意
定义了 slug 并不会 自动创建页面 URL。
Astro 的内容集合只是 数据层(content layer),不是自动生成的页面。 也就是说:
slug是内容的“标识符”,不是自动生成的网页路径。
除非你自己创建一个 页面模板(page template) 来根据这些内容渲染页面,否则 Astro 并不会自动为每个内容条目生成 URL。
slug 的作用不是直接生成网页路径,而是用来在代码中唯一标识、引用、查询内容。
它是“内容 ID”,不是“网页 URL”。
在 Astro 的内容集合(Content Collections)中,每个文件(Markdown、JSON 等)都会自动生成一个 id(通常是根据文件名来的)。
例如:
| 文件路径 | 自动生成的 id |
|---|---|
src/content/blog/1.md | "1" |
src/content/blog/hello-world.md | "hello-world" |
但是,有时候你希望自己控制这个 ID,比如:
- 让它更语义化(
my-first-post比1好记) - 支持层级结构(
guides/setup/astro) - 在不同集合之间建立关联
这时你就可以定义 slug,用它来 覆盖默认生成的 id。
在代码中通过 slug 查询内容
import { getEntryBySlug } from 'astro:content';

const post = await getEntryBySlug('blog', 'my-custom-id/supports/slashes');
slug 就是查询用的键。
如果你不定义它,就只能用自动生成的 ID(比如 "1"),语义不清晰也不方便维护。
在内容之间建立“引用关系”
比如你的博客文章引用一个作者:
author: reference('authors')Astro 内部其实是通过 id / slug 来识别对应的条目。
所以如果你希望作者文件的 ID 更清晰、能支持层级,就需要自定义 slug。
在生成页面时作为路径的一部分
虽然 Astro 不会自动根据 slug 生成页面,
但你完全可以在自己的路由模板里用它来定义 URL,比如:
---
// src/pages/blog/[...slug].astro
import { getCollection } from 'astro:content';
const posts = await getCollection('blog');
const post = posts.find(p => p.id === Astro.params.slug);
---
<h1>{post.data.title}</h1>
查询集合
可用属性:
{
    id: 'test/post-1.md',
    data: {
        title: 'Frontmatter Title',
        description: 'This is the first post of my new Astro blog.',
        authors: [ [Object] ]
    },
    body: '# My First Blog Post\r\n',
    filePath: 'src/content/docs/test/post-1.md',
    digest: 'b8c3d2243bb47b9f',
    rendered: {
        html: '<h1 id="my-first-bl',
        metadata: {
            headings: [Array],
            localImagePaths: [],
            remoteImagePaths: [],
            frontmatter: [Object],
            imagePaths: []
        }
    },
    collection: 'docs',
    slug: 'test/post-1',
    render: [Function: render]
}
可以直接自己调用
render()const { slug } = Astro.params; const allDocs = await getCollection("docs"); const MD = allDocs.find((d) => d.slug === slug); const { Content, headings } = await MD.render();有部分属性可能没有:
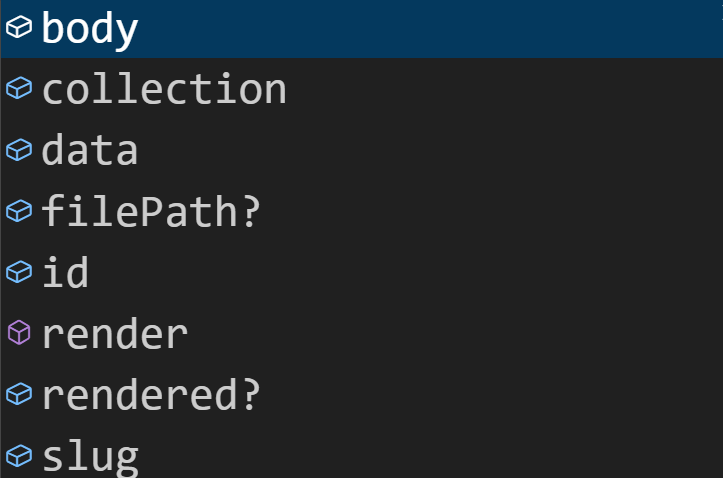
Astro 提供了一些辅助函数,用来查询集合(collection)并返回一个或多个内容条目(content entries)。
getCollection()获取整个集合,返回该集合中所有条目的数组。getEntry()从集合中获取单个条目。
这些函数返回的条目对象都包含:
- 一个唯一的 id;
- 一个包含所有已定义属性的 data 对象;
- (如果内容是 Markdown、MDX 或 Markdoc 文件)还会包含一个 body 属性,其中是文档的原始、未编译内容。
import { getCollection, getEntry } from 'astro:content';
// 获取集合中的所有条目。// 需要集合的名称作为参数。
const allBlogPosts = await getCollection('blog');
// 从集合中获取单个条目。
// 需要集合的名称和 `id`
const poodleData = await getEntry('dogs', 'poodle');生成的集合(collections)的排序顺序是不确定的,并且会因平台而异。这意味着,当你调用 getCollection() 获取集合内容时,返回的条目顺序并不固定。
如果你需要让返回的条目按特定顺序排列(例如按照日期排序的博客文章),就必须手动对集合条目进行排序。
src/pages/blog.astro
---
import { getCollection } from 'astro:content';

const posts = (await getCollection('blog')).sort(
  (a, b) => b.data.pubDate.valueOf() - a.data.pubDate.valueOf(),
);
---
请参阅 CollectionEntry 类型 返回的完整属性列表。
在 Astro 模板中使用内容
在查询完你的内容集合(collections)之后,你可以在 Astro 组件模板中直接访问每个条目的内容。 例如,你可以创建一个博客文章链接列表,并通过每个条目的 data 属性 来显示其 frontmatter 中的信息。
src/pages/index.astro
---

import { getCollection } from 'astro:content';

const posts = await getCollection('blog');

---

<h1>My posts</h1>

<ul>

  {posts.map(post => (

    <li><a href={`/blog/${post.id}`}>{post.data.title}</a></li>

  ))}

</ul>
渲染正文内容
查询后,你可以使用 render() 函数属性将 Markdown 和 MDX 条目渲染为 HTML。调用此函数将使你可以访问渲染的 HTML 内容,包括 <Content /> 组件和所有已渲染标题的列表。
src/pages/blog/post-1.astro
---
import { getEntry, render } from 'astro:content';

const entry = await getEntry('blog', 'post-1');
if (!entry) {
  // Handle Error, for example:
  throw new Error('Could not find blog post 1');
}
const { Content, headings } = await render(entry);
---
<p>Published on: {entry.data.published.toDateString()}</p>
<Content />
将内容作为 props 传递
一个组件也可以将整个集合条目(collection entry)作为属性(prop)传递。
你可以使用 CollectionEntry 工具类型(utility)来为组件的 props 提供正确的 TypeScript 类型。该工具类型接收一个字符串参数,这个字符串要与集合模式(schema)的名称相匹配,并且会自动继承该集合模式中定义的所有属性。
src/components/BlogCard.astro
---
import type { CollectionEntry } from 'astro:content';
interface Props {
  post: CollectionEntry<'blog'>;
}

// `post` will match your 'blog' collection schema type
const { post } = Astro.props;
---
筛选集合查询(Filtering collection queries)
getCollection() 接受一个可选的 “filter” 回调函数,该函数允许你根据条目的 id 或 data 属性 来筛选查询结果。
你可以用它根据任意内容条件进行筛选。
例如,可以根据 draft 属性来过滤出草稿文章,从而防止草稿博客文章被发布到你的博客中:
// 示例:使用 `draft: true` 过滤掉内容条目

import { getCollection } from 'astro:content';

const publishedBlogEntries = await getCollection('blog', ({ data }) => {

  return data.draft !== true;

});
你也可以创建在运行开发服务器时可用但不在生产中构建的草稿页面。
// 示例:仅在为生产构建时过滤掉带有 `draft: true` 的内容条目

import { getCollection } from 'astro:content';

const blogEntries = await getCollection('blog', ({ data }) => {

  return import.meta.env.PROD ? data.draft !== true : true;

});
过滤参数还支持按照集合中的嵌套目录进行过滤。由于 id 包含完整的嵌套路径,你可以通过每个 id 的开始来过滤,以仅返回特定嵌套目录中的条目:
// 示例:按集合中的子目录过滤条目

import { getCollection } from 'astro:content';

const englishDocsEntries = await getCollection('docs', ({ id }) => {

  return id.startsWith('en/');

});
访问被引用的数据(Accessing referenced data)
在查询集合条目之后,任何在模式(schema)中定义的引用(reference)都必须单独查询。
这是因为 reference()函数会将引用转换成一个包含 collection 和 id 两个key的对象。
因此,你可以使用:
getEntry()函数来获取单个被引用的条目,- 或者使用
getEntries()来从返回的数据对象中获取多个被引用的条目。
src/pages/blog/welcome.astro
---
import { getEntry, getEntries } from 'astro:content';

const blogPost = await getEntry('blog', 'welcome');

// 解析单个引用 (e.g. `{collection: "authors", id: "ben-holmes"}`)
const author = await getEntry(blogPost.data.author);
// 解析多个引用
// (e.g. `[{collection: "blog", id: "about-me"}, {collection: "blog", id: "my-year-in-review"}]`)
const relatedPosts = await getEntries(blogPost.data.relatedPosts);
---

<h1>{blogPost.data.title}</h1>
<p>Author: {author.data.name}</p>

<!-- ... -->

<h2>You might also like:</h2>
{relatedPosts.map(post => (
  <a href={post.id}>{post.data.title}</a>
))}
从内容生成路由(Generating Routes from Content)
内容集合(content collections)被存储在 src/pages/ 目录之外。这意味着默认情况下,Astro 不会为你的集合条目自动生成页面或路由。
如果你希望为集合中的每个条目(例如每篇博客文章)生成独立的 HTML 页面,就需要手动创建一个动态路由(dynamic route)。
你的动态路由将会把传入的请求参数(例如在 src/pages/blog/[...slug].astro 文件中使用的 Astro.params.slug)
映射到对应的内容条目,从而为每个页面获取正确的数据。
具体生成方式取决于你的页面是预渲染(prerendered) 的(默认情况),还是由服务器按需渲染(rendered on demand) 的。
构建静态输出(默认)
如果你在构建一个静态网站(这是 Astro 的默认行为),请使用 getStaticPaths() 函数,在构建阶段从单个页面组件(例如 src/pages/[slug].astro)生成多个静态页面。
在 getStaticPaths() 中调用 getCollection(),以便在构建静态路由时获取你的集合数据。然后使用每个内容条目的 id 属性 来创建各自的 URL 路径。
每个页面都会接收到完整的集合条目对象作为 prop,这样你就可以在页面模板中直接使用这些数据。
src/pages/posts/[id].astro
---

import { getCollection, render } from 'astro:content';
// 1. Generate a new path for every collection entry
export async function getStaticPaths() {
  const posts = await getCollection('blog');
  return posts.map(post => ({
    params: { id: post.id },
    props: { post },
  }));
}
// 2. 对于你的模板,你可以直接从 prop 获取条目
const { post } = Astro.props;
const { Content } = await render(post);
---

<h1>{post.data.title}</h1>

<Content />
这将为 blog 集合 中的每个条目生成一个页面路由。例如,位于 src/blog/hello-world.md 的条目,其 id 为 hello-world,
因此它最终生成的 URL 将是:/posts/hello-world/
注意
如果你的自定义 slug 中包含 / 字符,用于生成带有多个路径层级的 URL,
则必须在动态路由页面的 .astro 文件名中使用剩余参数(rest parameter),
例如:src/pages/posts/[...slug].astro
这样 Astro 才能正确匹配和渲染带多级路径的动态路由。
构建服务器输出 (SSR)
如果你正在构建一个动态网站(使用 Astro 的 SSR 支持),则不需要在构建阶段提前生成任何路径。
相反,你的页面应当在请求到达时,根据请求信息(通过 Astro.request 或 Astro.params)按需获取对应的 slug,然后使用 getEntry() 函数来获取相应的内容条目。
src/pages/posts/[id].astro
---
import { getEntry, render } from "astro:content";
// 1. 从传入的服务器请求中获取 slug
const { id } = Astro.params;
if (id === undefined) {
  return Astro.redirect("/404");
}
// 2. 直接使用请求 slug 查询条目
const post = await getEntry("blog", id);
// 3. 如果条目不存在则重定向
if (post === undefined) {
  return Astro.redirect("/404");
}
// 4. 将条目渲染为模板中的 HTML
const { Content } = await render(post);
---
<h1>{post.data.title}</h1>
<Content />
何时创建集合
当你有一组具有相同结构的相关数据或内容时,就可以创建一个集合。
使用集合的主要好处包括:
- 定义统一的数据结构,以验证每个条目是否“正确”或“完整”,从而避免在生产环境中出现错误。
- 内容导向的 API,让查询更直观(例如使用
getCollection()而不是import.meta.glob()),在页面中导入并渲染内容时更加方便。 - 内容加载器(Content Loader)API,可用于检索内容,既提供内置加载器,也允许访问底层 API。社区中已有多个第三方加载器可用,你也可以编写自定义加载器,从任意数据源获取内容。
- 性能与可扩展性:内容层(Content Layer)API 支持在构建之间缓存数据,可轻松应对上万条内容。
你应该在以下情况定义集合:
- 你有多个文件或数据需要组织,它们具有相同的结构(例如:一系列 Markdown 格式的博客文章,都包含相同的 frontmatter 属性)。
- 你有存储在远程的现有内容(如 CMS 中的内容),希望利用集合的辅助函数和内容层 API,而不是手动使用
fetch()或 SDK 获取数据。 - 你需要获取成千上万条相关数据,并且希望使用支持大规模查询和缓存的机制。
什么时候不要使用集合
当你有多份内容且它们需要共享相同的属性时,集合能提供极佳的结构化管理、安全性和组织性。
但如果出现以下情况,集合可能并不适合:
- 你只有一页或少量不同的页面。此时可以直接创建单独的页面组件(例如
src/pages/about.astro),并在其中直接编写内容。 - 你要展示的文件不会被 Astro 处理(例如 PDF 文件)。这种静态资源应放在项目的
public/目录中。 - 你的数据源有自带的 SDK 或客户端库用于导入,而且这些库不兼容或不需要内容加载器;你也更倾向于直接使用它们。
- 你正在使用需要实时更新的 API。内容集合只会在构建时更新,如果你需要实时数据,应使用其他方式(例如按需渲染或在运行时获取数据)。
图像
Astro 为你提供了多种在网站上使用图像的方法,无论它们是本地存储在你的项目内,还是链接到外部 URL,或者在 CMS 或 CDN 中管理的。
Astro 提供内置的 image 和 picture Astro 组件,Markdown 图像语法(![]())处理,SVG 组件,以及 图像生成函数 来优化和/或转换你的图像。此外,你可以默认配置自动调整响应式图像,或在单个图像和图片组件上设置响应式属性。
在 .astro 或 Markdown 文件中,你可以选择使用原生 HTML 元素或 SVG 文件来引用图片,或者根据文件类型使用标准方式(例如在 MDX 和 JSX 中使用 <img />)。然而,Astro 不会对这些图片进行任何处理或优化。
Astro 中没有原生的视频支持,我们建议选择一个 托管视频服务 来处理优化和流式传输视频内容的需求。
在哪里存储图像
src/ vs public/
我们建议尽可能将本地图像保存在 src/ 中,以便 Astro 可以对其进行转换、优化和打包。/public 目录中的文件始终按原样服务或复制到构建文件夹中,不进行任何处理。
你在 src/ 中存储的本地图像可以被项目中的所有文件使用:.astro、.md、.mdx、.mdoc 和其他 UI 框架。图像可以存储在任何文件夹中,包括与你的内容一起。
如果你想要避免对图像做任何处理,请将图像存储在 public/ 文件夹中。这些图像可以作为你网站域上的 URL 路径供你的项目文件使用,并允许你拥有指向它们的直接公共链接。例如,你的网站图标通常会放在此文件夹的根目录中,以便浏览器可以识别它。
.astro 文件中的图像
Astro 的模板语言提供了多种图片处理方式:
- 使用
<Image />组件 可渲染优化后的图片。 - 使用
<Picture />组件 可生成多尺寸、多格式的响应式图片。 - 两个组件都支持自适应容器大小和设备屏幕分辨率的属性。
此外:
- 你可以在
.astro文件中直接导入并使用 SVG 文件作为组件。 - 所有原生 HTML 标签(如
<img>、<svg>)都能使用,但它们不会经过 Astro 优化或转换,只会被原样复制到构建文件夹中。
关于图片路径的规则:
- 本地图片(位于
src/):通过相对路径导入。<Image>和<Picture>用命名导入:src={rocket}<img>标签使用导入对象的.src属性:src={rocket.src}
- 远程或 public/ 文件夹中的图片:使用 URL 路径。
- 远程图片示例:
src="https://www.example.com/images/example.jpg" - public 图片示例:
src="/images/example.jpg"(对应public/images/example.jpg)。
- 远程图片示例:
src/pages/blog/my-images.astro
---
import { Image } from 'astro:assets';
import localBirdImage from '../../images/subfolder/localBirdImage.png';
---
<Image src={localBirdImage} alt="A bird sitting on a nest of eggs." />
<Image src="/images/bird-in-public-folder.jpg" alt="A bird." width="50" height="50" />
<Image src="https://example.com/remote-bird.jpg" alt="A bird." width="50" height="50" />

<img src={localBirdImage.src} alt="A bird sitting on a nest of eggs.">
<img src="/images/bird-in-public-folder.jpg" alt="A bird.">
<img src="https://example.com/remote-bird.jpg" alt="A bird.">
请参阅 <Image/> 和 <Picture/> 组件的完整 API 参考,包括必需和可选属性。
Markdown 文件中的图像
在你的 .md 文件中使用标准的 Markdown  语法。
你存储在 src/ 中的本地图片以及远程图片都将经过处理和优化。当你全局配置响应式图片时,这些图片也将是响应式的。
src/pages/post-1.md
# 我的 Markdown 页面
<!-- 存储在 src/assets/ 中的本地图像 -->
<!-- 使用相对文件路径或导入别名 -->

<!-- 存储在 public/images/ 中的图像 -->
<!-- 使用相对于 public/ 的文件路径 -->

<!-- 其他服务器上的远程图像 -->
<!-- 使用图像的完整 URL -->
UI 框架组件中的图像
图像选项: 框架自己的图像语法(例如 JSX 中的 <img />,Svelte 中的 <img>)
必须首先导入本地图像才能访问其图像属性,例如 src。然后,你可以像在该框架自己的图像语法中通常那样渲染它们:
src/components/ReactImage.jsx
import stars from "../assets/stars.png";
export default function ReactImage() {  return (    <img src={stars.src} alt="繁星点点的夜空。" />  )}
Astro 组件(例如 <Image />、<Picture />、SVG 组件)在 UI 框架组件中不可用,因为客户端岛必须只包含其自身框架的有效代码。
但是,你可以将这些组件生成的静态内容作为子项传递给 .astro 文件内的框架组件:
src/components/ImageWrapper.astro
---
import ReactComponent from './ReactComponent.jsx';
import { Image } from 'astro:assets';
import stars from '~/stars/docline.png';
---
<ReactComponent>
  <Image src={stars} alt="A starry night sky." />
</ReactComponent>
用于图像的 Astro 组件
Astro 提供了两个内置的 Astro 图像组件(<Image /> 和 <Picture />),还允许你导入 SVG 文件并将其用作 Astro 组件。这些组件可以在任何可以导入和渲染 .astro 组件的文件中使用。
| 组件 | 功能简介 | 适用场景 | 特点 | 示例 |
|---|---|---|---|---|
<Image /> | 显示优化后的图片 | 本地图片(src/)或授权的远程图片 | 构建时或按需生成优化版本,可调整尺寸、格式、质量;自动添加 alt、loading、decoding 等属性,防止 CLS(布局偏移) | astro<br>import { Image } from 'astro:assets';<br>import img from '../assets/my.png';<br><Image src={img} alt="示例图片" class="my-class" /> |
<Picture /> | 生成 <picture> 标签,提供多格式、多尺寸图片 | 需要适配多种浏览器格式或响应式图片 | 可自动生成多种格式(如 avif、webp、png),支持构建时和按需处理 | import { Picture } from 'astro:assets';import img from '../assets/my.png';<Picture src={img} formats={['avif','webp']} alt="示例图片" /> |
| 导入 SVG | 将 .svg 文件作为 Astro 组件使用 | 在 .astro 文件中直接嵌入矢量图 | 可像组件一样导入和渲染 | import MyIcon from '../icons/icon.svg';<MyIcon /> |
| HTML 原生标签 | <img>、<svg> 等原生标签 | 简单静态图片展示 | 不会被 Astro 优化或转换,直接复制到构建目录 | <img src="/images/test.png" alt="" /> |
✅ 提示:
- 使用
<Image />或<Picture />可以统一图片处理方式并避免布局跳动(CLS)。 public/或未配置的远程图片也能用<Image />显示,但不会被优化。
响应式图像行为
添加于: astro@5.10.0
响应式图片是指能够自动调整以改善在不同设备上性能的图片。这些图片可以根据容器的大小调整尺寸,并根据访问者的屏幕尺寸和分辨率提供不同大小的版本。
通过将响应式图片属性应用到 <Image /> 或 <Picture /> 组件,Astro 将为你的图片自动生成所需的 srcset 和 sizes 值,并应用必要的样式以确保它们正确地调整大小。
当这种响应式行为被全局配置后,它将应用于所有图片组件,也应用于任何使用 Markdown ![]() 语法引用的本地和远程图片。
https://docs.astro.build/en/guides/images/#responsive-image-behavior
选择 <Image /> 还是 <img>
<Image /> 组件会优化你的图像,并根据原始宽高比推断宽度和高度(对于它可以处理的图像),以避免 CLS。这是尽可能在 .astro 文件中使用图像的首选方式。
当你不能使用 <Image /> 组件时,请使用 HTML <img> 元素,例如:
- 不支持的图像格式
- 当你不想让 Astro 优化你的图像时
- 为了在客户端动态访问和更改
src属性
授权远程图像
你可以使用 image.domains 和 image.remotePatterns 配置授权图像源 URL 域和模式列表,以进行图像优化。这个配置是一个额外的安全层,用于在显示来自外部源的图像时保护你的站点。
来自其他来源的远程图像不会被优化,但是使用 <Image /> 组件可以防止累积布局移位(CLS)。
例如,以下配置将只允许来自 astro.build 的远程图像进行优化:
astro.config.mjs
export default defineConfig({
  image: {
    domains: ["astro.build"],

  }
});
以下配置将只允许来自 HTTPS 主机的远程图像:
astro.config.mjs
export default defineConfig({
  image: {
    remotePatterns: [{ protocol: "https" }],
  }
});
内容集合中的图像
你可以在 frontmatter 中为内容集合条目声明一个关联图像,例如博客文章的封面图像,使用其相对于当前文件夹的路径:
src/content/blog/my-post.md
---
title: "My first blog post"
cover: "./firstpostcover.jpeg" # will resolve to "src/content/blog/firstblogcover.jpeg"
coverAlt: "A photograph of a sunset behind a mountain range."
---
This is a blog post
内容集合 schema 中的 image 辅助函数允许你验证并导入图像。
src/content.config.ts
import { defineCollection, z } from "astro:content";

const blogCollection = defineCollection({
  schema: ({ image }) => z.object({
    title: z.string(),
    cover: image(),
    coverAlt: z.string(),
  }),
});

export const collections = {
  blog: blogCollection,
};
参数
({ image }):Astro 在调用schema时会传入一些“辅助验证函数”,其中image()就是专门用于图片字段的。
image()是 Astro 提供的一个 特殊的 Zod 验证器生成函数。 它的作用是告诉 Astro:“这个字段指向一个图片文件(本地路径),请验证路径合法并解析为图片对象。”
图像将被导入并转换为元数据,允许你将其作为 src 传递给 <Image/>、<img> 或 getImage()。
下面的示例显示了一个博客索引页面,该页面从上面的模式中呈现了每篇博客文章的封面照片和标题:
src/pages/blog.astro
---
import { Image } from "astro:assets";
import { getCollection } from "astro:content";
const allBlogPosts = await getCollection("blog");
---

{
  allBlogPosts.map((post) => (
    <div>
      <Image src={post.data.cover} alt={post.data.coverAlt} />
      <h2>
        <a href={"/blog/" + post.slug}>{post.data.title}</a>
      </h2>
    </div>
  ))
}
使用 getImage() 生成图像
getImage() 函数旨在生成要在其他地方使用的图像,而不是直接在 HTML 中使用,例如在 API 路由 中。当你需要 <Picture> 和 <Image> 组件当前不支持的选项时,你可以使用 getImage() 函数创建你自己的自定义 <Image /> 组件。
请参阅 getImage() 参考 以了解更多信息。
Alt 文本
不是所有用户都能以相同的方式看到图像,因此在使用图像时,无障碍性尤为重要。使用 alt 属性为图像提供 描述性的 alt 文本。
这个属性对于 <Image /> 和 <Picture /> 组件都是必需的。如果没有提供 alt 文本,将提供一个有用的错误消息,提醒你包含 alt 属性。
如果图像仅仅是装饰性的(即不会对页面的理解有所贡献),请设置 alt="" 以便屏幕阅读器知道忽略该图像。
数据获取
.astro 文件可以在构建时获取远程数据来辅助页面生成。
Astro 中的 fetch()
所有 Astro 组件 都可以在它们的组件脚本中通过全局 fetch() 函数来使用完整的 URL(例如 https://example.com/api )发起 HTTP 请求到 API。 此外,你可以使用 new URL("/api", Astro.url) 构建一个 URL,指向你的项目中按需在服务器上渲染的页面和端点。
fetch 调用将会在构建时执行,并且数据都可用于组件模板中来生成动态 HTML。如果启用 SSR 模式,任何 fetch 调用都将在运行时执行。
💡 在 Astro 组件 script 中使用 顶层 await 的优势。
💡 将获取的数据作为参数传递给 Astro 和框架组件。
src/components/User.astro
---
import Contact from "../components/Contact.jsx";
import Location from "../components/Location.astro";

const response = await fetch("https://randomuser.me/api/");
const data = await response.json();
const randomUser = data.results[0];
---
<!-- 在构建时(Build Time)获取的数据可以直接渲染到 HTML -->
<h1>User</h1>
<h2>{randomUser.name.first} {randomUser.name.last}</h2>

<!-- 在构建时获取的数据可以作为 props 传递给组件 -->
<Contact client:load email={randomUser.email} />
<Location city={randomUser.location.city} />
注意
请记住,Astro 组件中的所有数据都是在渲染组件时获取的。
你部署的 Astro 站点将在构建时获取一次数据。在开发中,你将在组件刷新时看到数据获取。如果你需要在客户端多次重新获取数据,请在 Astro 组件中使用框架组件或客户端脚本。
在框架组件中使用 fetch()
fetch() 函数也可在任何框架组件中全局使用:
const data = await fetch('https://example.com/movies.json').then((response) =>
评论
评论加载中……