Astro-构建组件
Astro 组件非常灵活。一个 Astro 组件可以小到只是一段 HTML 代码片段,例如一组常用的 <met…
组件
Astro 组件是 Astro 项目的基础构建模块。它们是纯 HTML、无需客户端运行时的模板组件,并使用了 .astro 的文件名后缀。
Astro 组件非常灵活。一个 Astro 组件可以小到只是一段 HTML 代码片段,例如一组常用的 <meta> 标签,用于简化 SEO 设置;也可以是可复用的 UI 元素,比如页眉(header)或用户资料卡(profile card);甚至还可以包含整个页面布局(layout),或者,当组件位于特殊的 src/pages/ 文件夹中时,它本身就可以是一整个页面。
Astro 组件最重要的一点是:它们不会在客户端(浏览器)中渲染。Astro 组件会在构建时(build-time)或按需(on-demand)渲染为纯 HTML。你可以在组件的前端脚本区域(frontmatter)中编写 JavaScript 代码,但这些代码都会在最终发送给用户浏览器的页面中被完全剔除。 最终结果是一个加载更快的网站,并且默认情况下不会添加任何 JavaScript 负担。
当你的 Astro 组件确实需要在客户端进行交互时,你可以使用标准的 HTML <script> 标签,或者引入 UI 框架组件(如 React、Vue、Svelte 等),将它们作为所谓的 “客户端岛屿(client islands)”。
对于需要渲染个性化或动态内容的组件,你可以通过添加一个 server 指令 来推迟其在服务器端的渲染。这些 “服务端岛屿(server islands)” 会在其内容准备好后再进行渲染,从而不会阻塞整个页面的加载。
组件结构
Astro 组件是由两个主要部分所组成的——组件 script 和组件模板。每个部分分工处理最终呈现出一个既容易使用,又有足够的表现力来实现你的想象的框架。
src/components/EmptyComponent.astro
---
// 组件脚本(JavaScript)
---
<!-- 组件模板(HTML + JS 表达式)-->
组件脚本
Astro 使用代码围栏(---)来识别 Astro 组件中的组件脚本。如果你以前写过 Markdown,你可能已经熟悉了叫做 frontmatter 的类似概念。Astro 的组件脚本的想法直接受到了这个概念的启发。
你可以使用组件脚本来编写渲染模板所需 JavaScript 代码。这可以包括:
- 导入其他 Astro 组件
- 导入其他框架组件,如 React
- 导入数据,如 JSON 文件
- 从 API 或数据库中获取内容
- 创建你要在模板中引用的变量
src/components/MyComponent.astro
---
import SomeAstroComponent from '../components/SomeAstroComponent.astro';
import SomeReactComponent from '../components/SomeReactComponent.jsx';
import someData from '../data/pokemon.json';

// 访问传入的组件参数,如 `<X title="Hello, World"/>`
const { title } = Astro.props;

// 获取外部数据,甚至可以从私有 API 和数据库中获取
const data = await fetch ('SOME_SECRET_API_URL/users').then (r => r.json ());
---
<!-- 你的模板在这! -->
代码围栏的设计是为了保证你在其中编写的 JavaScript 被“围起来”。它不会逃到你的前端应用程序中,或落入你的用户手中。你可以安全地在这里写一些昂贵或敏感的代码(比如调用你的私人数据库),而不用担心它会出现在你的用户的浏览器中。
组件模板
在组件脚本下面的是组件模板。组件模板决定了你的组件的 HTML 输出。
如果你在这里写普通的 HTML,你的组件将在任何 Astro 页面上呈现它被导入和使用的 HTML。
然而,Astro 的组件模板语法也支持 JavaScript 表达式、Astro 的 <style> 与 <script> 标签、导入的组件,以及一些 特殊的 Astro 指令(directives)。在组件脚本(即 frontmatter 或 <script> 区域)中定义的数据和变量,可以在组件模板中使用,用于生成动态创建的 HTML 内容。
src/components/MyFavoritePokemon.astro
---
// 你的组件脚本在这!
import Banner from '../components/Banner.astro';
import Avatar from '../components/Avatar.astro';
import ReactPokemonComponent from '../components/ReactPokemonComponent.jsx';
const myFavoritePokemon = [/* ... */];
const { title } = Astro.props;
---
<!-- 支持 HTML 注释! -->
{/* JS注释语法也是有效的! */}

<Banner />
<h1>你好,世界!</h1>

<!-- 使用组件脚本中的 props 和其他变量: -->
<p>{title}</p>

<!-- 延迟组件渲染并提供回退加载内容: -->
<Avatar server:defer>
  <svg slot="fallback" class="generic-avatar" transition:name="avatar">...</svg>
</Avatar>

<!-- 包含了使用 `client:` 指令以进行水合的其他 UI 框架组件: -->
<ReactPokemonComponent client:visible />

<!-- 混合 HTML 和 JavaScript 表达式,类似于 JSX: -->
<ul>
  {myFavoritePokemon.map ((data) => <li>{data.name}</li>)}
</ul>

<!-- 使用模板指令从多个字符串甚至对象来构建类名! -->
<p class:list={["add", "dynamic", { classNames: true }]} />
组件参数
Astro 组件可以定义和接受参数。然后,这些参数可用于组件模板以呈现 HTML。可以在 frontmatter script 中的 Astro.props 中使用。
这是一个接收 greeting 和 name 参数的组件示例。请注意,要接收的参数是从全局 Astro.props 对象中解构的。
GreetingHeadline.astro
---
// 使用:<GreetingHeadline greeting="你好" name="朋友" />
const { greeting, name } = Astro.props
---
<h2>{greeting},{name}!</h2>
当该组件在其他 Astro 组件、布局或页面中导入并渲染时,可以将这些 props 作为属性传递:
src/components/GreetingCard.astro
---
import GreetingHeadline from './GreetingHeadline.astro';
const name = "Astro";
---
<h1>Greeting Card</h1>
<GreetingHeadline greeting="嗨" name={name} />
<p>希望你有美好的一天!</p>
你也可以使用 TypeScript 中的 interface 来定义 Props 类型。Astro 会自动在你的 frontmatter 中找到 Props interface,并为你的项目提供类型警告/错误。这些 props 也可以在从 Astro.props 解构时给出默认值。
src/components/GreetingHeadline.astro
---
interface Props {
  name: string;
  greeting?: string;
}

const { greeting = "你好", name } = Astro.props;
---
<h2>{greeting},{name}!</h2>
当没有提供组件参数时,可以给它默认值来使用。
src/components/GreetingHeadline.astro
---
const { greeting = "你好", name = "宇航员" } = Astro.props;
---
<h2>{greeting},{name}!</h2>
插槽
<slot /> 元素是嵌入外部 HTML 内容的占位符,你可以将其他文件中的子元素注入(或“嵌入”)到组件模板中。
默认情况下,传递给组件的所有子元素都将呈现在 <slot /> 中。
与 props(属性) 不同,
props是传递给 Astro 组件的参数,可以通过Astro.props在组件的任意位置使用; 而 slots(插槽) 则是在组件模板中渲染子级的 HTML 元素,它们会在被书写的位置直接输出内容。
src/components/Wrapper.astro
---
import Header from './Header.astro';
import Logo from './Logo.astro';
import Footer from './Footer.astro';

const { title } = Astro.props;
---
<div id="content-wrapper">
  <Header />
  <Logo />
  <h1>{title}</h1>
  <slot />  <!-- children will go here -->
  <Footer />
</div>
src/pages/fred.astro
---
import Wrapper from '../components/Wrapper.astro';
---
<Wrapper title="Fred's Page">
  <h2>All about Fred</h2>
  <p>Here is some stuff about Fred.</p>
</Wrapper>
这种模式是 Astro 布局组件 的基础:整个 HTML 内容的页面可以用 <SomeLayoutComponent></SomeLayoutComponent> 标签围起来并发送到组件,以在那里定义的公共页面元素中呈现。
命名插槽
Astro 组件也可以有命名插槽。这允许你仅将具有相应插槽名称的 HTML 元素传递到插槽的位置。
src/components/Wrapper.astro
---
import Header from './Header.astro';
import Logo from './Logo.astro';
import Footer from './Footer.astro';

const { title } = Astro.props;
---
<div id="content-wrapper">
  <Header />
  <!--  带有 `slot="after-header"` 属性的子项在这 -->
  <slot name="after-header" />
  <Logo />
  <h1>{title}</h1>
  <!--  没有 `slot` 或有 `slot="default"` 属性的子项在这 -->
  <slot />
  <Footer />
  <!--  带有 `slot="after-footer"` 属性的子项在这 -->
  <slot name="after-footer" />
</div>
要将 HTML 内容注入特定插槽,可以在任何子元素上使用 slot 属性来指定插槽的名称。组件的所有其他子元素将被注入到 default(未命名)的 <slot /> 中。
src/pages/fred.astro
---
import Wrapper from '../components/Wrapper.astro';
---
<Wrapper title="Fred 的页面">
  <img src="https://my.photo/fred.jpg" slot="after-header" />
  <h2>关于 Fred 的一切</h2>
  <p>这里有一些关于 Fred 的东西。</p>
  <p slot="after-footer">版权所有 2022</p>
</Wrapper>
要将多个 HTML 元素传递到组件的 <slot/> 占位符中而无需包装 <div>,可以在 Astro 的 <Fragment/>组件上使用 slot="" 属性:
src/components/CustomTable.astro
---
// 创建一个自定义的表格,为表头和表格主体内容设置具名的 slot 占位符
---
<table class="bg-white">
  <thead class="sticky top-0 bg-white"><slot name="header" /></thead>
  <tbody class="[&_tr:nth-child(odd)]:bg-gray-100"><slot name="body" /></tbody>
</table>
使用 slot="" 属性以指定 "header" 和 "body" 内容以注入多行和多列的 HTML 内容。也可以对单个 HTML 元素进行样式设置:
src/components/StockTable.astro
---
import CustomTable from './CustomTable.astro';
---
<CustomTable>
  <Fragment slot="header"> <!-- 传递表头 -->
    <tr><th>产品名称</th><th>库存单位</th></tr>
  </Fragment>
  <Fragment slot="body"> <!-- 传递表格主体 -->
    <tr><td>人字拖</td><td>64</td></tr>
    <tr><td>靴子</td><td>32</td></tr>
    <tr><td>运动鞋</td><td class="text-red-500">0</td></tr>
  </Fragment>
</CustomTable>
请注意,命名插槽必须是组件的直接子级。不能通过嵌套元素传递命名插槽。
插槽回退内容
插槽还可以渲染回退内容。当没有匹配的子元素传递给插槽时,<slot /> 元素将呈现其自己的占位符子元素。
src/components/Wrapper.astro
---
import Header from './Header.astro';
import Logo from './Logo.astro';
import Footer from './Footer.astro';

const { title } = Astro.props;
---
<div id="content-wrapper">
  <Header />
  <Logo />
  <h1>{title}</h1>
  <slot>
    <p>当没有子项传入插槽时使用此回退</p>
  </slot>
  <Footer />
</div>
传递插槽
插槽可以传递给其他组件。例如,在创建嵌套布局时:
src/layouts/BaseLayout.astro
---
---
<html lang="en">
  <head>
    <meta charset="utf-8" />
    <link rel="icon" type="image/svg+xml" href="/favicon.svg" />
    <meta name="viewport" content="width=device-width" />
    <meta name="generator" content={Astro.generator} />
    <!--命名插槽-->
    <slot name="head" />
  </head>
  <body>
    <slot />
  </body>
</html>
src/layouts/HomeLayout.astro
---
import BaseLayout from "./BaseLayout.astro";
---
<BaseLayout>
  <!--命名与传递插槽-->
  <slot name="head" slot="head" />
  <slot />
</BaseLayout>
通过在
<slot />标记上使用name和slot属性,可以将具名插槽传递给另一个组件。
HTML 组件
Astro 支持导入和使用 .html 文件作为组件,或者将这些文件放在 src/pages 子目录下作为页面。如果你正在复用一个没有使用框架的现有网站代码,或者你想确保你的组件没有动态功能,你可能会需要使用 HTML 组件。
HTML 组件必须只包含有效的 HTML,因此缺乏关键的 Astro 组件功能:
- 它们不支持 frontmatter、服务器端导入或动态表达式。
- 任何
<script>标签都不会被打包,默认视为带有is:inline指令进行处理。 - 它们只能 引用
public/文件夹中的资源。
注意
HTML 组件内的 <slot /> 元素会像在 Astro 组件中那样工作。要使用 HTML Web Component Slot 元素,请在 <slot> 元素中添加 is:inline。
布局
布局是特殊的 Astro 组件,可用于创建可重用的页面模板。
我们通常将“布局”用于提供共享页面的常用 UI 元素(如标题、导航栏和页脚)的 Astro 组件。典型的 Astro 布局组件为 Astro、Markdown 或 MDX 页面提供:
- 一个 页面外壳(
<html>、<head>和<body>标签) - 一个 “ 来指定单个页面内容应该被注入的位置。
但是,布局组件没有什么特别的!它们可以像任何其他 Astro 组件一样接受 props和导入和使用其他组件。它们可以包含UI 框架组件和客户端脚本。它们甚至不必提供完整的页面外壳,而是可以用作部分 UI 模板。
然而,如果布局组件确实包含页面外壳,那么它的 <html> 元素必须是该组件中所有其他元素的父元素。
布局组件通常放置在项目中的 src/layouts 目录中,但这不是必须的。你可以选择将它们放置在项目中的任何位置。你甚至可以通过在布局组件名称前面加上“_”将布局组件与页面放在同一个文件夹中。
示例布局
src/layouts/MySiteLayout.astro
---
import BaseHead from '../components/BaseHead.astro';
import Footer from '../components/Footer.astro';
const { title } = Astro.props;
---
<html lang="en">
  <head>
    <meta charset="utf-8">
    <meta name="viewport" content="width=device-width, initial-scale=1">
    <BaseHead title={title}/>
  </head>
  <body>
    <nav>
      <a href="#">主页</a>
      <a href="#">文章</a>
      <a href="#">联系</a>
    </nav>
    <h1>{title}</h1>
    <article>
      <slot /> <!-- 你的内容会被插入到这里 -->
    </article>
    <Footer />
  </body>
  <style>
    h1 {
      font-size: 2rem;
    }
  </style>
</html>
src/pages/index.astro
---
import MySiteLayout from '../layouts/MySiteLayout.astro';
---
<MySiteLayout title="Home Page">
  <p>我的页面内容,被包裹在一个布局中!</p>
</MySiteLayout>
在布局中使用 TypeScript
任何 Astro 布局都可以通过提供 props 类型来引入类型安全和自动补全功能:
---
interface Props {
  title: string;
  description: string;
  publishDate: string;
  viewCount: number;
}
const { title, description, publishDate, viewCount } = Astro.props;
---
Markdown 布局
页面布局对于没有任何页面格式的 Markdown 页面尤为有用。
Astro 提供了一个特殊的 layout frontmatter 属性,用于在 src/pages/ 目录中使用基于文件的路由的单个 .md 文件来指定使用哪个 .astro 组件作为页面布局。这个组件允许你提供 <head> 内容,例如 meta 标签(例如 <meta charset="utf-8">)和样式,用于 Markdown 页面。默认情况下,指定的组件可以自动访问 Markdown 文件中的数据。
layout是一个特殊属性,当使用内容集合来查询和渲染你的内容时,不会被识别。
src/pages/page.md
---
layout: ../layouts/BlogPostLayout.astro
title: "Hello, World!"
author: "Matthew Phillips"
date: "09 Aug 2022"
---
所有的 frontmatter 属性都可以作为 Astro 布局组件的 props。

`layout` 属性是 Astro 提供的唯一一个特殊属性。

你可以在 `src/pages/` 目录下的 Markdown 文件中使用它。
一个典型的 Markdown 页面布局包括:
- 一个
frontmatterprop,用于访问 Markdown 页面的 frontmatter 和其他数据。 - 一个默认的
<slot/>,用于指定页面的 Markdown 内容应该被渲染的位置。
src/layouts/BlogPostLayout.astro
---
// 1. `frontmatter` prop 提供了访问 frontmatter 和其他数据的能力
const { frontmatter } = Astro.props;
---
<html>
  <head>
    <!-- 添加其他 Head 元素,例如样式和 meta 标签。 -->
    <meta name="viewport" content="width=device-width, initial-scale=1">
    <meta charset="utf-8">
    <title>{frontmatter.title}</title>
  </head>
  <body>
    <!-- 添加其他 UI 组件,例如通用的头部和页脚。 -->
    <h1>{frontmatter.title} by {frontmatter.author}</h1>
    <!-- 2. 渲染的 HTML 将被传入默认插槽。 -->
    <slot />
    <p>写于: {frontmatter.date}</p>
  </body>
</html>
你可以使用 MarkdownLayoutProps 帮助程序设置布局的 Props 类型:
src/layouts/BlogPostLayout.astro
---
import type { MarkdownLayoutProps } from 'astro';

type Props = MarkdownLayoutProps<{
  // 在这里定义 frontmatter 属性
  title: string;
  author: string;
  date: string;
}>;

// 现在,`frontmatter`、`url` 和其他 Markdown 布局属性
// 可以通过 TypeScript 类型安全地访问
const { frontmatter, url } = Astro.props;
---
Markdown 布局的 Props
一个 Markdown 布局将通过 Astro.props 访问以下信息:
file- 此文件的绝对路径(例如/home/user/projects/.../file.md)。url- 此页面的 URL(例如/zh-cn/guides/markdown-content)。frontmatter- Markdown 或 MDX 文档中所有的 frontmatter。frontmatter.file- 与顶级file属性相同。frontmatter.url- 与顶级url属性相同。
headings- Markdown 或 MDX 文档中的标题(h1 -> h6)列表及其相关元数据。此列表遵循类型:{ depth: number; slug: string; text: string }[]。rawContent()- 返回原始 Markdown 文档的字符串的函数。compiledContent()- 返回 Markdown 文档编译为 HTML 字符串的异步函数。
注意
Markdown 布局将通过 Astro.props 访问其文件的所有 可用属性,但有两点关键区别:
- 标题信息(即
h1 -> h6元素)可通过headings数组访问,而不是getHeadings()函数。 file和url也作为嵌套的frontmatter属性(即frontmatter.url和frontmatter.file)可用。
嵌套布局
布局组件无需包含整个页面的 HTML。你可以将布局分解为更小的组件,然后重用这些组件以创建更灵活、更强大的布局。
例如,BlogPostLayout.astro 布局组件可以对文章的标题、日期和作者进行样式化。然后,BaseLayout.astro 可以处理页面模板的其余部分,例如导航和页脚。你还可以将从文章接收的 props 传递给另一个布局,就像任何其他嵌套组件一样。
src/layouts/BlogPostLayout.astro
---
import BaseLayout from './BaseLayout.astro';
const { frontmatter } = Astro.props;
---
<BaseLayout url={frontmatter.url}>
  <h1>{frontmatter.title}</h1>
  <h2>文章作者: {frontmatter.author}</h2>
  <slot />
</BaseLayout>
样式和 CSS
Astro 的设计为了使设计和编写 CSS 变得轻而易举。直接在 Astro 组件中编写你自己的 CSS,或者导入你最喜欢的 CSS 库,如 Tailwind 外。也支持高级样式设计语言,如 Sass 和 Less。
在 Astro 进行设计
为 Astro 组件设计样式,就像在你的组件或页面模板上添加 <style> 标签一样容易。当你在 Astro 组件内置了 <style> 标签时,Astro 就会自动检测 CSS 并开始为你处理样式。
src/components/MyComponent.astro
<style>
  h1 { color: red; }
</style>
作用域样式
Astro <style> 标签内的 CSS 规则默认自动限定范围。作用域样式在幕后编译,只适用于写在同一组件内的 HTML。你在 Astro 组件中编写的 CSS 会自动封装在该组件中。
现有 CSS:
src/pages/index.astro
<style>
  h1 {
    color: red;
  }

  .text {
    color: blue;
  }
</style>
编译为:
<style>
  h1[data-astro-cid-hhnqfkh6] {
     color: red;
  }

  .text[data-astro-cid-hhnqfkh6] {
    color: blue;
  }
</style>
作用域样式不会泄漏,也不会影响你网站的其他部分。在 Astro 中,可以使用像 h1 {} 或 p {} 这样的低特定性选择器,因为在最终输出中它们与作用域一起被编译。
作用域样式也不适用于模板内的其他 Astro 组件。如果你需要修改子组件的样式,可以考虑将该组件包裹在 <div>(或其他元素)中,然后你就可以对其编写样式了。
作用域样式的特定性被保留,允许它们与其他 CSS 文件或 CSS 库一起工作,同时仍然保留防止样式应用于组件之外的独特边界。
全局样式
虽然我们推荐大多数组件使用范围化的样式,但有时你可能有必要使用全局的、非限定范围的 CSS。你可以通过 <style is:global> 属性选择不自动限定 CSS 范围。
src/components/GlobalStyles.astro
<style is:global>
  /* 无作用域,直接传递给浏览器。
     适用于网站上的所有 <h1> 标签。 */
  h1 { color: red; }
</style>
你也可以使用 :global() 选择器在同一个 <style> 标签中混合全局和作用域 CSS 规则。这可以将 CSS 样式应用于子组件。
<style>
  /* 仅限于此组件。 */
  h1 { color: red; }
  /* 混合:仅限于子组件的 <h1> 标签。 */
  article :global(h1) {
    color: blue;
  }
</style>
<h1>Title</h1>
<article><slot /></article>
用 class:list 组合类名
如果你需要在元素上动态组合类名,你可以在 .astro 文件中使用 class:list 工具属性。
src/components/ClassList.astro
---
const { isRed } = Astro.props;
---
<!-- 如果 `isRed` 是真值,class 将是 "box red"。 -->
<!-- 如果 `isRed` 是假值,class 将是 "box"。 -->
<div class:list={['box', { red: isRed }]}><slot /></div>

<style>
  .box { border: 1px solid blue; }
  .red { border-color: red; }
</style>
CSS 变量
添加于: astro@0.21.0
Astro <style> 可以引用页面上任何可用的 CSS 变量。你也可以在组件的 frontmatter 中直接使用 define:vars 指令来传递 CSS 变量。
src/components/DefineVars.astro
---
const foregroundColor = "rgb(221 243 228)";
const backgroundColor = "rgb(24 121 78)";
---
<style define:vars={{ foregroundColor, backgroundColor }}>
  h1 {
    background-color: var(--backgroundColor);
    color: var(--foregroundColor);
  }
</style>
<h1>Hello</h1>
参见 指令参考 页面,了解更多关于
define:vars的信息。
传递 class 给子组件
在 Astro 中,像 class 这样的 HTML 属性 并不会自动传递给子组件。
相反,你需要在子组件中显式地声明一个 class 属性(prop),然后将它应用到组件的根元素上。
如果你在前端脚本中对 props 进行了解构赋值(destructuring),必须重命名 class,因为 class 是 JavaScript 的保留字。
在使用 Astro 的默认 作用域样式策略(scoped style strategy) 时,还需要传递一个 data-astro-cid-* 属性。
为什么要传
data-astro-cid-*Astro 的 作用域样式(Scoped CSS) 机制,会自动为每个组件生成一个类似:
<div data-astro-cid-abcd1234>当你把
class和其他属性传给子组件时,如果没有传递data-astro-cid-*,Astro 可能无法知道子组件属于哪个样式作用域。这会导致父组件的样式无法正确应用到子组件内部。
你可以通过将 ...rest(其余属性)传递给组件来实现这一点。
如果你已将 scopedStyleStrategy 设置为 'class' 或 'where',则不需要传递 ...rest 属性。
关于
scopedStyleStrategyAstro 默认的样式隔离策略是通过
data-astro-cid-*实现的。但如果你在配置中将scopedStyleStrategy改成'class'或'where', Astro 会改用其他方式(例如类名或 CSS where() 选择器)来实现样式作用域,这样就不再需要手动传...rest。
src/components/MyComponent.astro
---
const { class: className, ...rest } = Astro.props;
---
<div class={className} {...rest}>
  <slot/>
</div>
备注
解释:
const { class: className }是因为class是 JavaScript 保留字,不能直接用。...rest表示接收其他传入的属性(比如id、data-*等),然后继续传下去。<div class={className} {...rest}>把这些属性真正应用到组件的根元素上。
src/pages/index.astro
---
import MyComponent from "../components/MyComponent.astro"
---
<style>
  .red {
    color: red;
  }
</style>
<MyComponent class="red">这将是红色!</MyComponent>
父组件的作用域样式(Scoped styles from parent components)
由于
data-astro-cid-*属性会让子组件包含在父组件的样式作用域中, 因此,父组件的样式可能会级联(cascade)影响到子组件。为了避免出现这种意料之外的样式干扰,请确保在子组件中使用唯一的类名(class name)。
内联样式
你可以使用 style 属性将 HTML 元素设置为内联样式。这可以是 CSS 字符串或 CSS 属性的对象:
src/pages/index.astro
// 这两种写法是等价的:
<p style={{ color: "brown", textDecoration: "underline" }}>My text</p>
<p style="color: brown; text-decoration: underline;">My text</p>
外部样式
有两种使用外部全局样式表的方法:项目源文件中使用 ESM 导入;使用绝对链接引用 public/ 目录中的文件或托管于别处的文件。
导入本地样式表
你可以在 Astro 组件中使用 ESM 导入语法显式导入样式表。CSS 导入方式与 Astro 组件中的其他 ESM 导入一样,它应该基于组件进行引用,并且与其他导入一样必须位于组件脚本顶层:
src/pages/index.astro
---
// Astro 会自动为你捆绑和优化这些CSS。
// 这也适用于预处理器文件,如 .scss、.styl 等。
import '../styles/utils.css';
---
<html><!-- 你的页面在这 --></html>
任何 JavaScript 文件都支持通过 ESM import导入 CSS,包括像 React 和 Preact 这样的 JSX 组件。这有助于为 React 组件编写细化的,具有针对性的样式
从 npm 包中导入样式表
如果你使用的包在导入样式文件时没有指定文件扩展名(例如 package-name/styles),你需要先更新 Astro 的配置文件!
假设你从某个名为 package-name 的 npm 包中导入一个叫 normalize 的 CSS 文件,而你写的是(注意这里没有 .css 扩展名):
import "package-name/normalize";为了确保 Astro 能够正确地预渲染(prerender)你的页面,你需要在 astro.config.mjs 中将该包名称(例如 package-name)添加到配置项 vite.ssr.noExternal 的数组中:
export default {
  vite: {
    ssr: {
      noExternal: ['package-name']
    }
  }
}
你也可能需要从外部 npm 包中加载样式表。它常用于像导入 Open Props 这样的工具类。如果你的包建议使用文件扩展名(即 package-name/styles.css 而不是 package-name/styles),那么它的行为应该与本地样式表一致:
注意
这是针对 Vite 的设置 与 Astro SSR 无关。
Astro 在构建时,会使用 Vite SSR(服务端渲染) 机制来提前生成 HTML。当它发现你导入一个包时,会默认将该包视为「外部依赖」(external dependency),即:不会去解析它的源代码,而是直接从打包结果中引入。 当你导入一个没有文件扩展名的样式文件时,例如:
import "package-name/styles";Vite 在服务端渲染(SSR)阶段可能无法正确解析这个路径,因为它不知道这个文件到底是 .css、.scss 还是 .js。
于是 Astro 就需要你显式告诉它:
“这个包(
package-name)不要作为 external 处理,让 Vite 进去解析它的源代码。”
这正是 vite.ssr.noExternal 的作用。
通过 link 标签加载静态样式表
你也可以使用 <link> 元素在页面上加载样式表。它是应该位于 /public 目录下的 CSS 文件的绝对路径,或者是外部网站的链接。不支持使用相对路径的 <link> href 值。
<head>
  <!-- 本地:/public/styles/global.css -->
  <link rel="stylesheet" href="/styles/global.css" />
  <!-- 外部 -->
  <link rel="stylesheet" href="https://cdn.jsdelivr.net/npm/prismjs@1.24.1/themes/prism-tomorrow.css">
</head>
因为这种方法使用 public/ 目录,它跳过了 Astro 提供的 CSS 处理、捆绑和压缩。
Tailwind
Astro 支持在项目中添加流行的 CSS 库、工具和框架,如 Tailwind 和其他库!
Astro 同时支持 Tailwind 3 和 4。你可以通过 CLI 命令 添加 Vite 插件 到你的项目以添加 Tailwind 4 支持,或者手动安装旧版依赖项来添加 Tailwind 3 支持。
如果你要将你现有 Astro 项目的 Tailwind 3 升级到 4,你需要在添加 Tailwind 4 相关依赖的同时,删除旧版 Tailwind 3 相关依赖。
添加 Tailwind 4 支持
在 Astro >=5.2.0 中,使用 astro add tailwind 命令来安装 Tailwind 官方的 Vite 插件。如果要在早期版本的 Astro 中添加 Tailwind 4 支持,请按照 Tailwind 文档中的指引 手动添加 @tailwindcss/vite Vite 插件。
npx astro add tailwind然后,将 tailwindcss 导入到 src/styles/global.css(或你选择的其他 CSS 文件)中,使 Tailwind 类对你的 Astro 项目可用。如果你使用 astro add tailwind 命令来安装 Vite 插件,那么这个包含导入语句的文件将被默认创建。
src/styles/global.css
@import "tailwindcss";将此文件导入到你希望 Tailwind 应用的页面中。这一步骤通常是在布局组件中完成的,以便 Tailwind 样式可以在共享该布局的所有页面上使用:
src/layouts/Layout.astro
---
import "../styles/global.css";
---
CSS 预处理器
Astro 支持通过 Vite 使用 CSS 预处理器,如 Sass、Stylus 和 Less。
Sass 和 SCSS
npm install sass在 .astro 文件中使用 <style lang="scss"> 或 <style lang="sass">。
Stylus
npm install stylus在 .astro 文件中使用 <style lang="styl"> 或 <style lang="stylus">。
Less
npm install less在.astro 文件中使用 <style lang="less">。
LightningCSS
npm install lightningcss在 astro.config.mjs 中更新你的 vite 配置:
astro.config.mjs
import { defineConfig } from 'astro/config'

export default defineConfig({
  vite: {
    css: {
      transformer: "lightningcss",
    },
  },
})
在框架组件中
你也可以在 JS 框架内使用上述所有的 CSS 预处理程序!请务必遵循每个框架推荐的模式。
- React / Preact:
import Styles from './styles.module.scss'; - Vue:
<style lang="scss"> - Svelte:
<style lang="scss">
高级
is:inline 是一个 样式指令(style directive),用于控制样式在构建时的输出方式。它告诉 Astro:
👉 “不要把这个样式提取成单独的 CSS 文件,而是直接内联(inline)到生成的 HTML 中。”
基本示例
<style is:inline>
  h1 {
    color: red;
  }
</style>

<h1>Hello Astro</h1>
输出结果
<h1 style="color:red">Hello Astro</h1>✅ 它能用,但 ⚠️ 有严格限制条件。
如果你使用环境或结构不符合要求,就会触发
Internal server error: No Astro CSS at index 0。
触发 No Astro CSS at index 0 的原因
这个错误不是说你“语法错了”,而是 Astro 没能正确关联样式作用域上下文。
主要会在以下几种情况下发生:
| 触发原因 | 说明 |
|---|---|
❌ <style is:inline> 位于最顶层页面(不是组件内) | 顶层 .astro 文件无法正确索引 CSS 模块,Astro 内部构建器找不到对应的 CSS 插槽。 |
❌ 页面包含完整的 <html>、<head> | 这会让 Astro 的样式插入逻辑失效,因为它默认会将样式注入自动生成的 <head>。 |
| ❌ 页面或布局在热更新 (HMR) 时出错 | Astro 的 Vite 插件有 bug,会在 HMR 阶段无法找到 index 0 的样式引用。 |
❌ 同时使用了 is:inline + is:global | 两个指令不能共存。 |
你说的 is:inline 是正确的特性,但不能用于顶层 .astro 页面结构里。
只要它放在组件或普通页面(没有 <html> 包裹)中,就不会再报 No Astro CSS at index 0。
scopedStyleStrategy
Astro 默认会把组件样式限制在当前组件内部,避免「样式污染」。为此,它必须在HTML 元素和CSS 选择器之间建立“唯一对应关系”。
scopedStyleStrategy 就是定义 Astro 如何实现这种对应关系的配置。
你可以在 astro.config.mjs 中设置:
export default {
scopedStyleStrategy: 'attribute' // 默认策略
}
它有三种取值:
'attribute' | 'class' | 'where'1️⃣ 'attribute'(默认方式)
Astro 会自动给组件里的元素添加唯一属性,例如:
<div data-astro-cid-abcd1234>对应的 CSS 会是:
div[data-astro-cid-abcd1234] {
color: red;
}
✅ 优点:完全隔离,安全稳定
⚠️ 缺点:要传 data-astro-cid-*,否则子组件不会被算在父作用域中
2️⃣ 'class' 模式
Astro 改用 类名 来实现作用域隔离。
示例:
<div class="astro-ABCD1234">生成的 CSS:
div.astro-ABCD1234 {
color: red;
}
这样样式是通过类名限定的。
因为类名会自动绑定在根元素上,所以不需要再传递 ...rest。
✅ 优点:兼容性更好,HTML 代码更干净
3️⃣ 'where' 模式
Astro 使用 CSS 的 :where() 选择器 实现作用域。
在 scopedStyleStrategy: 'where' 模式下,Astro 会给组件的根节点加上一个类名,比如:
<div class="astro-ABCD1234">
<p>我是组件内部的内容</p>
</div>
然后生成的样式类似:
:where(.astro-ABCD1234) p {
    color: red;
}
这意味着组件的所有元素都自动包含在 .astro-ABCD1234 的作用域中。
此时浏览器天然知道 .astro-child 位于 .astro-parent 之内,所以作用域关系已经在 CSS 层面被解析完成
样式不生效BUG
---
import { getCollection } from "astro:content";

const docs = await getCollection("docs");
let count = 0;
---

<meta charset="UTF-8" />
<title>Markdown List</title>
<h1>Markdown List Page</h1>

<!-- 列表容器 -->
<ul id="list"></ul>

<!-- 分页容器 -->
<div class="pagination" id="pagination"></div>

<style is:global>
    body {
        font-family: sans-serif;
        padding: 20px;
    }
    ul {
        list-style: none;
        padding: 0;
    }
    li {
        margin-bottom: 6px;
    }
    .pagination {
        display: flex;
        gap: 6px;
        margin-top: 20px;
    }
    .pagination button {
        padding: 4px 10px;
        border: 1px solid #ccc;
        background: white;
        cursor: pointer;
        border-radius: 4px;
    }
    .pagination button.active {
        background: #007bff;
        color: white;
    }
    .pagination button:disabled {
        opacity: 0.5;
        cursor: not-allowed;
    }
</style>
<script is:inline define:vars={{ _docs: docs }}>
    const docs = _docs;
    console.log(docs);

    let currentPage = 1;
    let pageSize = 2;
    let maxButtons = 7;

    const listEl = document.getElementById("list");
    const paginationEl = document.getElementById("pagination");

    function getPageList(total, current, max) {
        const list = [];
        const half = Math.floor(max / 2);

        if (total <= max) {
            for (let i = 1; i <= total; i++) list.push(i);
        } else {
            let start = Math.max(2, current - half + 2);
            let end = Math.min(total - 1, current + half - 2);

            if (current <= half) {
                start = 2;
                end = max - 2;
            } else if (current >= total - half + 1) {
                start = total - max + 3;
                end = total - 1;
            }

            list.push(1);
            if (start > 2) list.push("...");
            for (let i = start; i <= end; i++) list.push(i);
            if (end < total - 1) list.push("...");
            list.push(total);
        }
        return list;
    }

    function renderList() {
        listEl.innerHTML = "";
        const total = docs.length;
        const start = (currentPage - 1) * pageSize;
        const end = start + pageSize;
        const items = docs.slice(start, end);

        for (const post of items) {
            const li = document.createElement("li");
            li.innerHTML = `<a href="/docs/${post.slug}">${post.data.title} - ${post.data.pubDate}</a>`;
            listEl.appendChild(li);
        }
    }

    function renderPagination() {
        paginationEl.innerHTML = "";
        const total = Math.ceil(docs.length / pageSize);
        const pages = getPageList(total, currentPage, maxButtons);

        const prev = document.createElement("button");
        prev.textContent = "上一页";
        prev.disabled = currentPage === 1;
        prev.onclick = () => {
            if (currentPage > 1) {
                currentPage--;
                render();
            }
        };
        paginationEl.appendChild(prev);

        for (const p of pages) {
            const btn = document.createElement("button");
            btn.textContent = p;
            if (p === "...") {
                btn.disabled = true;
            } else {
                if (p === currentPage) btn.classList.add("active");
                btn.onclick = () => {
                    currentPage = p;
                    render();
                };
            }
            paginationEl.appendChild(btn);
        }

        const next = document.createElement("button");
        next.textContent = "下一页";
        next.disabled = currentPage === total;
        next.onclick = () => {
            if (currentPage < total) {
                currentPage++;
                render();
            }
        };
        paginationEl.appendChild(next);
    }

    function render() {
        renderList();
        renderPagination();
    }

    render();
</script>
如果不为<style>设置is:global,针对button的样式就会失效,这是由于button是js生成的,所以没有类似data-astro-cid-xesgsyug的属性
<h1 data-astro-cid-xesgsyug="">Markdown List Page</h1>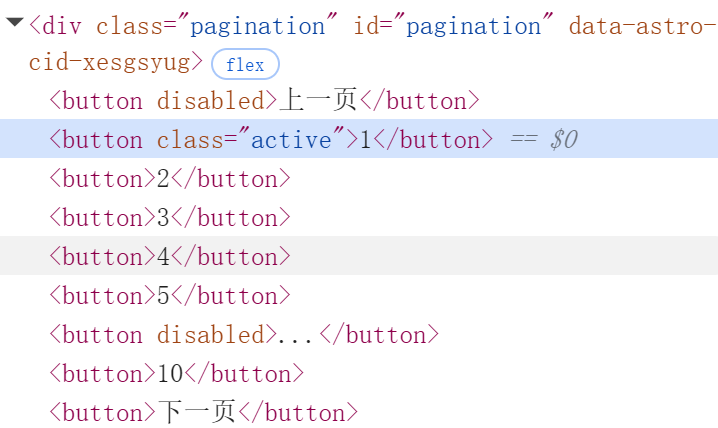
对于
.pagination button {
    padding: 4px 10px;
    border: 1px solid #ccc;
    background: white;
    cursor: pointer;
    border-radius: 4px;
}
最终是转化为:
.pagination[data-astro-cid-xesgsyug] button[data-astro-cid-xesgsyug] {
    padding: 4px 10px;
    border: 1px solid #ccc;
    background: white;
    cursor: pointer;
    border-radius: 4px;
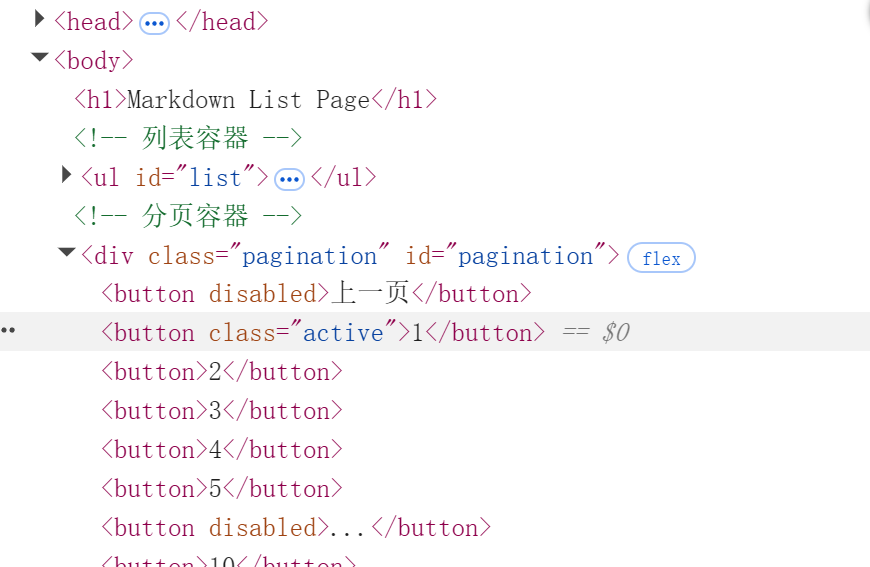
}设置完is:global之后
一个都不加属性了
使用自定义字体
本指南将向你展示如何将网页字体添加到你的项目中,并且在组件中使用这些字体。
使用本地字体文件
这个例子将演示使用字体文件添加自定义字体 DistantGalaxy.woff。
- 添加你的字体文件到
public/fonts/目录。 - 将以下
@font-face语句添加到你的CSS中。它可以位于你引入的全局.css文件,或在<style is:global>块中, 也可以是你想要使用字体的特定布局或组件中的<style>块中。
/* 注册你的自定义字体并告诉浏览器它在哪里 */
@font-face {
  font-family: 'DistantGalaxy';
  src: url('/fonts/DistantGalaxy.woff') format('woff');
  font-weight: normal;
  font-style: normal;
  font-display: swap;
}
使用 font-family 值为组件或布局中的元素设置字体样式。在此示例中,自定义字体将应用于 <h1> 标题,而不会用于段落 <p>。
---
---

<h1>In a galaxy far, far away...</h1>

<p>Custom fonts make my headings much cooler!</p>

<style>
h1 {
  font-family: 'DistantGalaxy', sans-serif;
}
</style>
使用字体资源包
Fontsource(字体资源包)项目简化了使用 Google Fonts 和其他开源字体的使用。它提供了 npm 模块,你可以为要使用的字体安装。
- 从 Fontsource 的目录中找到你想用的字体。此例子将选择 Twinkle Star字体。
- 安装你选择的字体的包。
npm install @fontsource/twinkle-star你可以在 Fontsource 网站上每个字体页面的“快速安装”部分找到正确的包名称。包名总是以
@fontsource/或@fontsource-variable/字体名称开头。
在要使用字体的布局或组件中导入字体包。通常,需要在通用布局组件中执行此操作,以确保该字体在你的网站上可用。
导入(import)将自动添加 @font-face 以设置字体所需的必要属性。
src/layouts/BaseLayout.astro
---
import '@fontsource/twinkle-star';
---
使用字体名称作为 font-family 值,正如 Fontsource 网站中的例子所示。这适用于任何可以在 Astro 项目中编写 CSS 的地方。
h1 {
  font-family: "Twinkle Star", cursive;
}
处理脚本和事件
你可以通过在组件模版中使用 <script> 标签发送 JavaScript 到浏览器,并且为 Astro 组件添加各种功能。
脚本用来向你的网站添加交互性,比如处理事件或者动态更新内容,而无需任何像 React、Svelte 或者 Vue 这样的 UI 框架。这避免了随框架一起分发大量 JavaScript 的开销,也不需要你掌握任何额外框架就能创建功能齐全的网站或应用。
客户端脚本
脚本可以用来添加事件监听器,发送分析数据,播放动画,以及其他所有 JavaScript 可以在 Web 上做的事情。
Astro 会自动增强 HTML 标准的 <script> 标签,提供打包、TypeScript 等功能。有关更多详细信息,请参阅 Astro 如何处理脚本。
src/components/ConfettiButton.astro
<button data-confetti-button>Celebrate!</button>

<script>
  // 从 npm 包导入
  import confetti from 'canvas-confetti';

  // 找到页面上的组件 DOM。
  const buttons = document.querySelectorAll('[data-confetti-button]');

  // 当 button 被点击时,添加事件监听器来触发 confetti。
  buttons.forEach((button) => {
    button.addEventListener('click', () => confetti());
  });
</script>想在脚本中使用Astro变量需要使用指令define:vars
---
import { getCollection } from "astro:content";

const docs = await getCollection("docs");
let count = 0;
---
<script define:vars={{ _docs:docs }}>
      const docs = _docs
</script>
脚本处理
默认情况下,Astro 会用以下方式处理不包含属性(除了 src 之外)的 <script> 标签:
- TypeScript 支持: 所有脚本默认使用 TypeScript。
- 导入打包: 导入本地文件或 npm 模块,会被打包在一起。
- 模块类型: 处理后的脚本会自动变成
type="module"。 - 去重: 如果包含
<script>的组件在页面上被多次使用,该脚本只会被包含一次。 - 自动内联: 如果脚本足够小,Astro 会将其直接内联到 HTML 中,以减少请求次数。
src/components/Example.astro
<script>
  // 会处理!会打包!TypeScript!
  // 也可以导入本地脚本和 npm 包。
</script>
未处理的脚本
Astro 不会处理包含除了 src 以外任何属性的 <script> 标签。
你可以添加 is:inline 指令来有意选择不对脚本进行处理。
src/components/InlineScript.astro
<script is:inline>
  // 将会被直接插入 HTML,不会有任何变化!
  // 不会被转换:没有 TypeScript,也没有被 Astro 解析导入。
  // 如果在组件内部使用,这段代码会为每个实例重复创建。
</script>
在你的页面中包含 JavaScript 文件
你可能希望将脚本编写为单独的 .js/.ts 文件,或者需要引用另一台服务器上的外部脚本。你可以通过在 <script> 标签的 src 属性中引用它们来做到这一点。
导入本地脚本
何时使用:当你的脚本位于 src/。
src/components/LocalScripts.astro
<!-- `src/scripts/local.js` 脚本的相对路径 -->
<script src="../scripts/local.js"></script>

<!-- 也适用于本地 TypeScript 文件 -->
<script src="./script-with-types.ts"></script>
加载外部脚本
何时使用: 当你的 JavaScript 文件位于 public/ 或 CDN 上。
要加载在项目的 src/ 文件夹之外的脚本,请使用 is:inline 指令。当你如上所述导入脚本时,此方法会跳过 Astro 提供的 JavaScript 处理、打包和优化。
src/components/ExternalScripts.astro
<!-- `public/my-script.js` 脚本的绝对路径 -->
<script is:inline src="/my-script.js"></script>

<!-- 远程服务器上脚本的完整 URL -->
<script is:inline src="https://my-analytics.com/script.js"></script>
常见脚本模式
处理 onclick 和其他事件
一些 UI 框架使用自定义语法来处理事件,例如@click="..." (Vue)。Astro 更严格地遵循标准 HTML,并且不对事件使用自定义语法。
相反,你可以在 <script> 标签中使用 addEventListener 来处理用户交互。
src/components/AlertButton.astro
<button class="alert">Click me!</button>

<script>
  // 在页面上找到所有带有 `alert` 类的按钮。
  const buttons = document.querySelectorAll('button.alert');
  // 处理每个按钮上的点击事件。
  buttons.forEach((button) => {
    button.addEventListener('click', () => {
      alert('按钮被点击了!');
    });
  });
</script>
如果你在一个页面上有多个 <AlertButton /> 组件,Astro 将不会多次运行该脚本。脚本是打包在一起的,每页只包含一次。使用 querySelectorAll 确保此脚本将事件侦听器附加到页面上找到的具有 alert 类的每个按钮。
具有自定义元素的 Web 组件
你可以使用 Web 组件标准创建具有自定义行为的 HTML 元素。在 .astro 组件中定义 自定义元素 允许你构建交互式组件而无需 UI 框架库。
在这个例子中,我们定义了一个新的 <astro-heart> HTML 元素,用于跟踪你点击喜欢按钮的次数并使用最新计数更新 <span>。
src/components/AstroHeart.astro
<!-- 将按钮包装在我们的自定义元素“astro-heart”中。 -->
<astro-heart>
  <button aria-label="Heart">💜</button> × <span>0</span>
</astro-heart>

<script>
  // 为我们的新 HTML 自定义元素定义行为。
  class AstroHeart extends HTMLElement {
    connectedCallback() {
      let count = 0;

      const heartButton = this.querySelector('button');
      const countSpan = this.querySelector('span');

      // 每次单击按钮时,更新计数。
      heartButton.addEventListener('click', () => {
        count++;
        countSpan.textContent = count.toString();
      });
    }
  }

  // 告诉浏览器将我们的 AstroHeart 类用于 <astro-heart> 元素。
  customElements.define('astro-heart', AstroHeart);
</script>
在这里使用自定义元素有两个优点:
- 除了使用
document.querySelector()搜索整个页面,你可以使用this.querySelector(),它只在当前自定义元素实例中搜索。这使得一次只处理一个组件实例的子实例变得更容易。 - 虽然
<script>只运行一次,但浏览器每次在页面上找到<astro-heart>时都会运行我们自定义元素的connectedCallback()方法。这意味着你可以安全地一次为一个组件编写代码,即使你打算在一个页面上多次使用该组件。
你可以在web.dev 的《可重用 Web 组件指南》和MDN 对自定义元素的介绍中了解更多自定义元素。
将 frontmatter 变量传递给脚本
在 Astro 组件中,frontmatter(--- 之间)中的代码在服务器上运行,而不是在浏览器中。
要将服务端变量传递给客户端脚本,可以使用 data-* 属性 在 HTML 中存储它们。脚本就可以使用 dataset 属性读取这些属性。
在此示例组件中,一个 message 属性存储在 data-message 属性中,因此自定义元素可以读取 this.dataset.message 并在浏览器中获取该属性的值。
src/components/AstroGreet.astro
---
const { message = '你好,世界!' } = Astro.props;
---

<!-- 将消息存储为数据属性。 -->
<astro-greet data-message={message}>
  <button>Say hi!</button>
</astro-greet>

<script>
  class AstroGreet extends HTMLElement {
    connectedCallback() {
      // 从 data(数据)属性中读取消息。
      const message = this.dataset.message;
      const button = this.querySelector('button');
      button.addEventListener('click', () => {
        alert(message);
      });
    }
  }

  customElements.define('astro-greet', AstroGreet);
</script>
现在我们可以多次使用我们的组件,并且每次都会收到不同的消息。
src/pages/example.astro
---
import AstroGreet from '../components/AstroGreet.astro';
---

<!-- 使用默认消息:“你好,世界!” -->
<AstroGreet />

<!-- 使用作为 props 传递的自定义消息。 -->
<AstroGreet message="构建组件的美好一天!" />
<AstroGreet message="很高兴你做到了!👋" />
当你将 props 传递给使用 React 等 UI 框架编写的组件时,这实际上是 Astro 在幕后所做的!对于带有
client:*指令的组件,Astro 创建了一个带有props属性的<astro-island>自定义元素,该属性将你的服务器端 props 存储在 HTML 输出中。
脚本和 UI 框架相结合
当 <script> 标签执行时,由 UI 框架渲染的元素可能还不可用。如果你的脚本还需要处理 UI 框架组件,建议使用自定义元素。
前端框架
在构建你的 Astro 网站时,无需放弃你喜欢的前端组件框架。你可以使用自己选择的 UI 框架来创建 Astro “岛屿”(Astro Islands)。
官方前端框架集成
Astro 官方支持多种流行的前端框架,包括 React、Preact、Svelte、Vue、SolidJS 和 AlpineJS,并提供了这些框架的官方集成。
使用框架组件
在 Astro 页面、布局和组件中就像 Astro 组件一样使用你的 JavaScript 框架组件。所有组件都可放在 /src/components 目录中,或者你也可以放在任何你喜欢的地方。
要使用框架组件,你需要在 Astro 组件脚本中使用相对路径导入它们。然后在其他组件、HTML 元素和类 JSX 表达式中使用它们。
src/pages/static-components.astro
---
import MyVueComponent from '../components/MyReactComponent.vue';
---
<html>
  <body>
    <h1>Use Vue components directly in Astro!</h1>
    <MyVueComponent />
  </body>
</html>
默认情况下,你的框架组件将渲染为静态 HTML。这对于模板组件而言非常有用,它不需要交互和避免分发没用的 JavaScript 给用户。
激活组件
框架组件可以使用 client:* 指令来激活(hydrate)。这些是用于确定何时将组件的 JavaScript 发送到浏览器的组件属性。
使用除 client:only 以外的所有客户端指令,你的组件将首先在服务器上渲染以生成静态 HTML。根据你选择的指令,将向浏览器发送组件 JavaScript。然后组件将被激活并变成可交互式的。
src/pages/interactive-components.astro
---
// 示例:在浏览器中激活框架组件。
import InteractiveButton from '../components/InteractiveButton.jsx';
import InteractiveCounter from '../components/InteractiveCounter.jsx';
import InteractiveModal from '../components/InteractiveModal.svelte';
---
<!-- 该组件的 JS 将在页面加载开始时导入 -->
<InteractiveButton client:load />

<!-- 该组件的 JS 将不会发送给客户端,直到用户向下滚动到该组件在页面上可见时 -->
<InteractiveCounter client:visible />

<!-- 这个组件不会在服务端渲染, 但是在页面加载时将渲染在客户端 -->
<InteractiveModal client:only="svelte" />
组件渲染所需的 JavaScript 框架(React、Svelte 等)将与组件自己的 JavaScript 一起发送到浏览器。如果页面上的两个或多个组件使用相同的框架,则该框架将只发送一次。
可用激活指令
这里有几个适用于 UI 框架组件的激活指令:client:load、client:idle、client:visible、client:media={QUERY} 和 client:only={FRAMEWORK}。
查看指令参考页面获取这些激活指令的详细描述以及用法。
向框架组件传递 Props
你可以从 Astro 组件向框架组件传递 props:
src/pages/frameworks-props.astro
---
import TodoList from '../components/TodoList.jsx';
import Counter from '../components/Counter.svelte';
---
<div>
  <TodoList initialTodos={["learn Astro", "review PRs"]} />
  <Counter startingCount={1} />
</div>
使用 client:* 指令 传递给交互式框架组件的属性必须序列化:转换为适合在网络传输或存储的格式。然而,Astro 并不能序列化所有类型的数据结构。因此,在将属性传递给已激活的组件时,存在一些限制。
以下是支持的属性类型:普通对象、number、string、Array、Map、Set、RegExp、Date、BigInt、URL、Uint8Array、Uint16Array、Uint32Array 和 Infinity
传递给组件的不支持的数据结构,如函数,只能在组件的服务器渲染期间使用,不能用于提供交互性。例如,不能传递函数给已激活的组件,因为 Astro 无法从服务器传递函数来让客户端执行。
向框架组件传递子组件
在 Astro 组件中,你可以向框架组件传递子组件。每个框架都有自己的模式来引用这些子组件:React、Preact 和 Solid 均使用一个特殊的属性名 children,而 Svelte 和 Vue 则使用 <slot /> 元素。
src/pages/component-children.astro
---
import MyReactSidebar from '../components/MyReactSidebar.jsx';
---
<MyReactSidebar>
  <p>这里是一个带有一些文字和一个按钮的侧边栏。</p>
</MyReactSidebar>另外你可以使用命名插槽来区分特定的子组件。
对于 React、Preact 和 Solid,这些插槽都会转换成顶级属性。使用 kebab-case 的插槽名会转换成 camelCase。
src/pages/named-slots.astro
---
import MySidebar from '../components/MySidebar.jsx';
---
<MySidebar>
  <h2 slot="title">菜单</h2>
  <p>这里是一个带有一些文字和一个按钮的侧边栏。</p>
  <ul slot="social-links">
    <li><a href="https://twitter.com/astrodotbuild">Twitter</a></li>
    <li><a href="https://github.com/withastro">GitHub</a></li>
  </ul>
</MySidebar>
src/components/MySidebar.jsx
<aside>
  <header><slot name="title" /></header>
  <main><slot /></main>
  <footer><slot name="social-links" /></footer>
</aside>
我可以在我的框架组件中使用 Astro 组件吗?
任何 UI 框架组件都会成为该框架的一个“孤岛”。这些组件必须完全作为该框架的有效代码来编写,只使用它自己的导入和包。你不能在一个 UI 框架组件(如 .jsx 或 .svelte)中导入 .astro 组件。
不过你可以在.astro组件内使用 Astro <slot/> 模式将 Astro 组件生成的静态内容作为子项传递给框架组件。
src/pages/astro-children.astro
---
import MyReactComponent from  '../components/MyReactComponent.jsx';
import MyAstroComponent from '../components/MyAstroComponent.astro';
---
<MyReactComponent>
  <MyAstroComponent slot="name" />
</MyReactComponent>
评论
评论加载中……